
Latest News
Hello Everybody
Just to update any interested customers, for the time being we've had to withdraw the etched components from our price list as we are finding it increasingly difficult to get them processed in a reasonable time frame.
We'll keep you posted here with any other changes.
-------------------------------------------
We'll have to see whether we are able to attend the Guildex show in Stafford as it looks as though Paul is going to be demonstrating instead. I may be able to bring the CPL stand, but we're still making arrangements. So again, we'll keep you posted.
The plan is to continue running CPL both by mail order and attending O Gauge trade events where possible and maintaining trade supply as we have done up to now.
As I'm sure a lot of you will understand only too well, the costs of materials and the casting / etching processes have increased over the last 6 or 7 years, and we have now gone through our price list to revise a number of products with the necessary revisions.
If you by chance have one of the old paper price list booklets, by all means use them as a parts list while ignoring the prices quoted as they're no longer current. Please do check in at [email protected] for an updated quotation, or just take a look at the contact form and price lists page in the menu.
Apologies for any inconvenience caused.
Back soon
Michelle
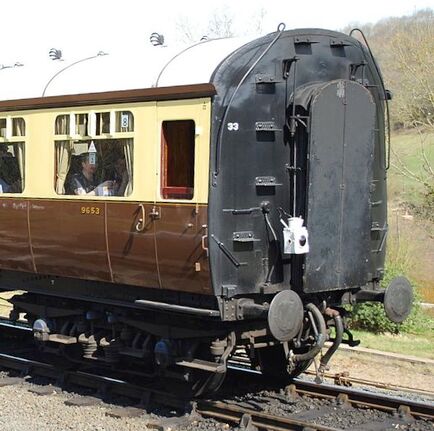
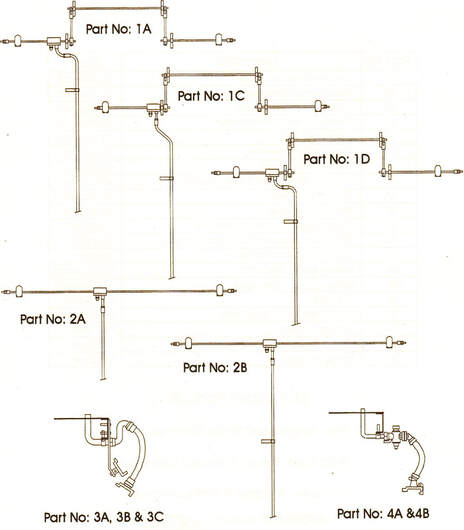
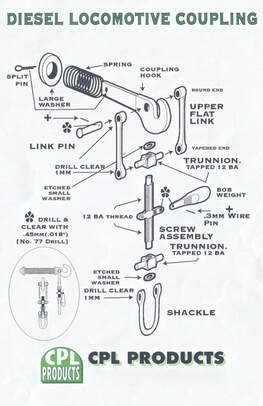
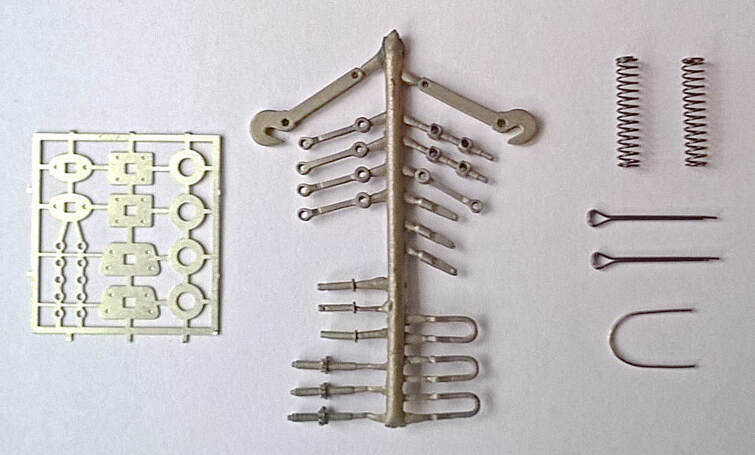
We have put in some time lately developing a kit for pre-grouping style bufferbeam safety chains. As we have had a few supplier difficulties, there are only a few kits currently in stock, but we expect to have full availability of these new products hopefully within a few weeks from now. Of course, these did vary from company to company, so we have tried to include enough parts and spare components to enable different variations to be made quite easily. I have included some copy from the instruction leaflet and a simple exploded view, please see below.
Assembly: Clean up the castings using fine files and emery sticks where necessary. A lot of this is best done while the castings are still attached to the sprue. Mark up the vehicle buffer beam and drill a 1.2mm hole either side of the main hook at the correct position and spacing according to reference. Press the turned brass trunnion into position and solder the stub in at the back of the buffer beam. Note: This is best done using the spare wire inserted to ensure the hole is in its correct horizontal position.
Carefully saw the shackles from the sprue, and round up the ends with fine files and emery board. Please note these are highly visible so make a good job of this, using a magnifying glass. Separate the hooks from the sprue and clean them up the same way. Fit the small middle links over the shackle with the last one attached to the Lost Wax Brass hook, remembering to keep the open side of the hook pointing back towards the vehicle With the assembled chain complete and the links neatly closed using long nosed pliers, fit the top shackles over the stanchions and feed a length of wire through the top components. Solder one end of the wire flush with the top shackle, file nearly flush, and snip the other end slightly proud of the shackle, filing it flat with a small protrusion allowed. Generally make sure that the top shackle hinges freely and that there is no stiffness, ensuring the assembly hangs naturally. The safety chain can be chemically blackened with Carr's Metal Black before fitting if required. Please note: Some companies used different arrangements with longer links and occasionally, just one hook to right or left instead of a pair, so again, please do consult reference on this, and if necessary use the spare wire provided to produce longer links by tightly wrapping the 20 thou wire around a suitable 40 thou plastikard strip cut to the correct internal length of any required extra links. In each case go round the plastikard former twice to replicate two of each type before snipping them at the centre of one side with a Xuron type track cutter, then cutting the former to release the link without distortion. |
This kit produces a set of four safety chains as typically fitted to both locomotives and carriages, mainly in the pre-grouping era.
These were normally fitted in pairs, evenly spaced either side of the main coupling hook, but as spacings and arrangements did vary from company to company, reference must be sought to replicate the correct details for your particular vehicle. Some patience and careful workmanship here will result in a better, more authentic look to older stock, particularly at the front bufferbeams of locomotives. The chains are supplied with Brass Lost Wax coupling hooks and top shackles, along with links, spare wire and stanchions. The following tools should be at hand for assembly: A piercing saw with fine blades, a 1.2mm drill bit (for the bufferbeam stanchion hole), a pair of long nose pliers and fine files and emery boards. 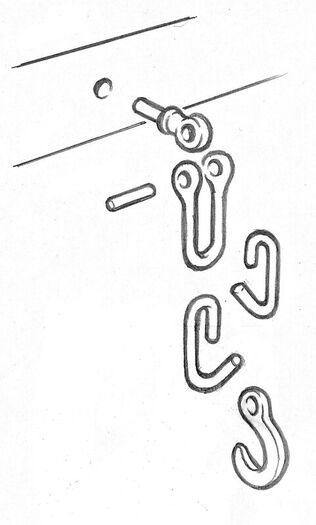
|

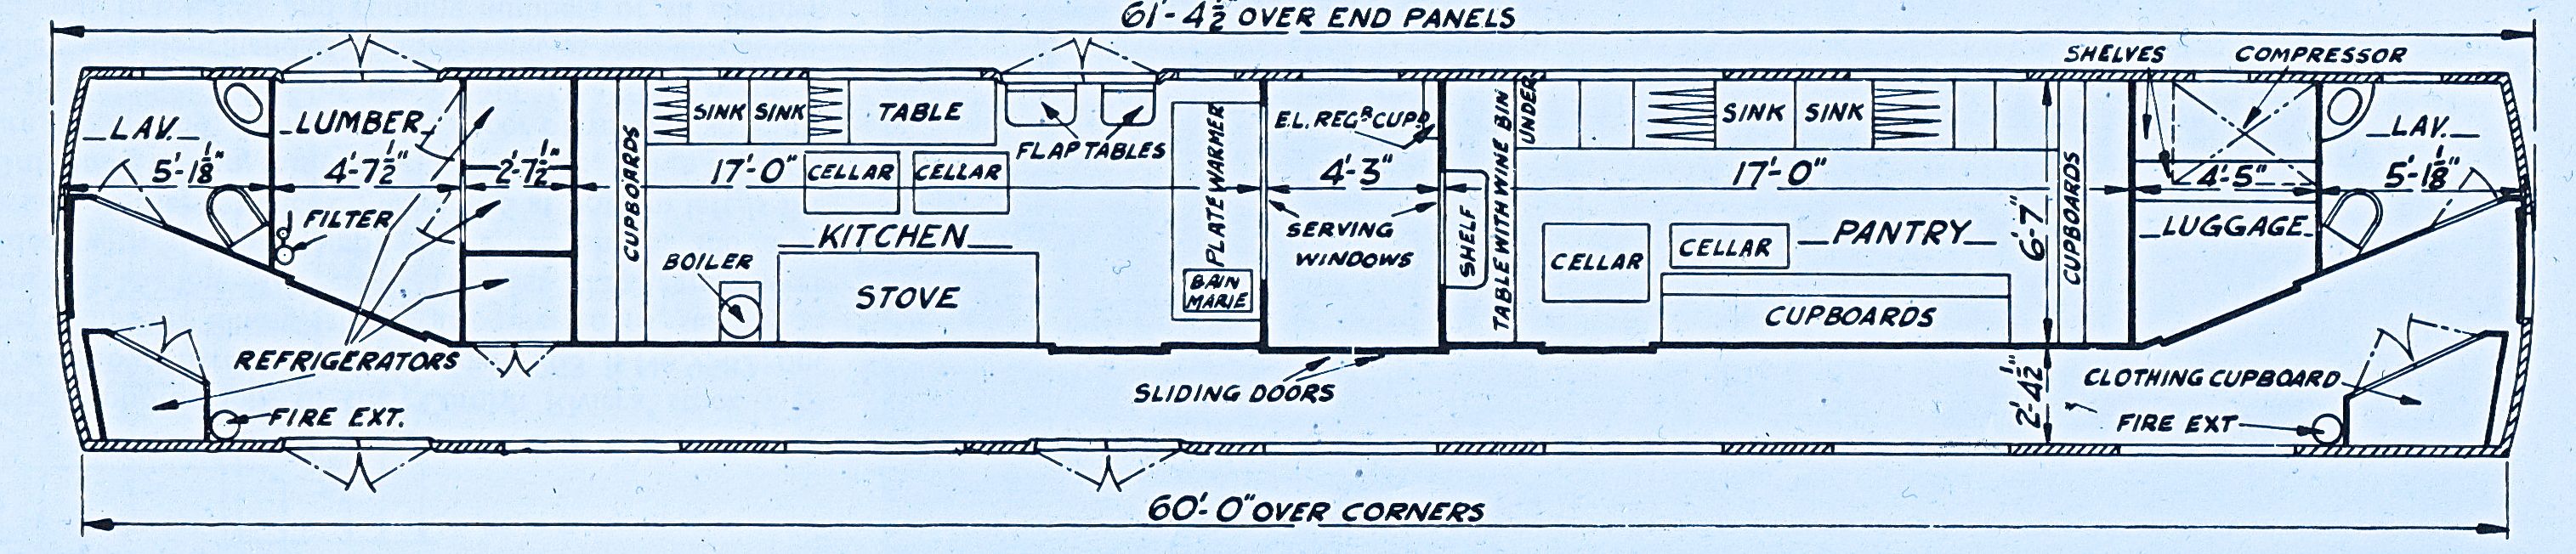
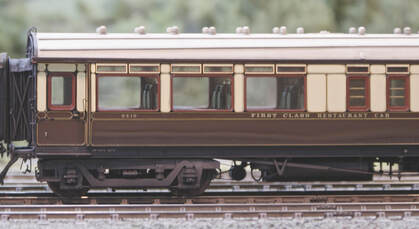
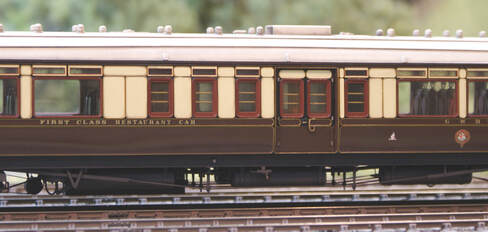
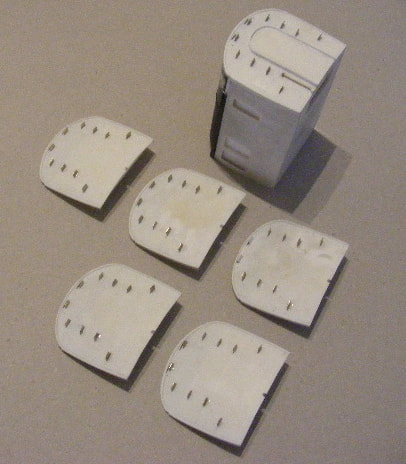
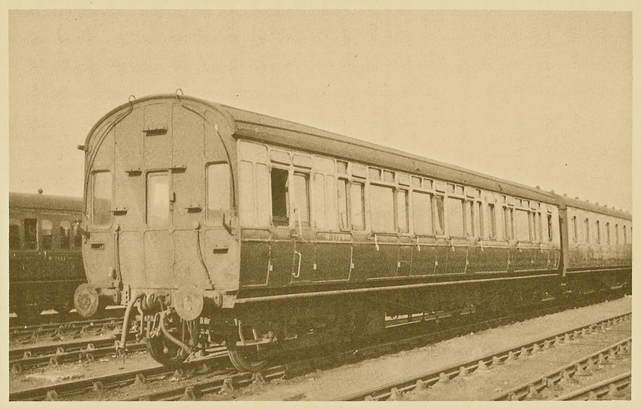
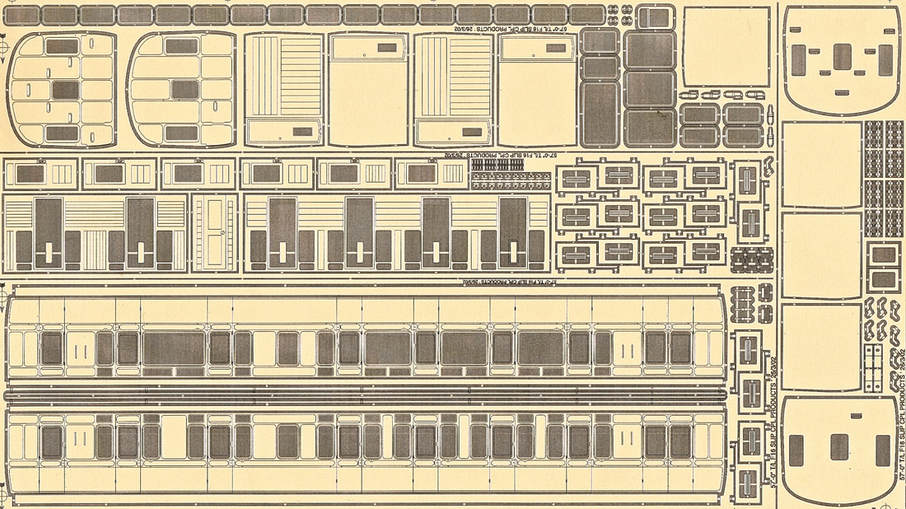
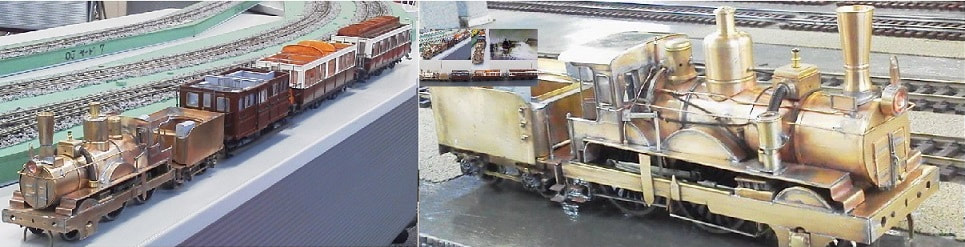
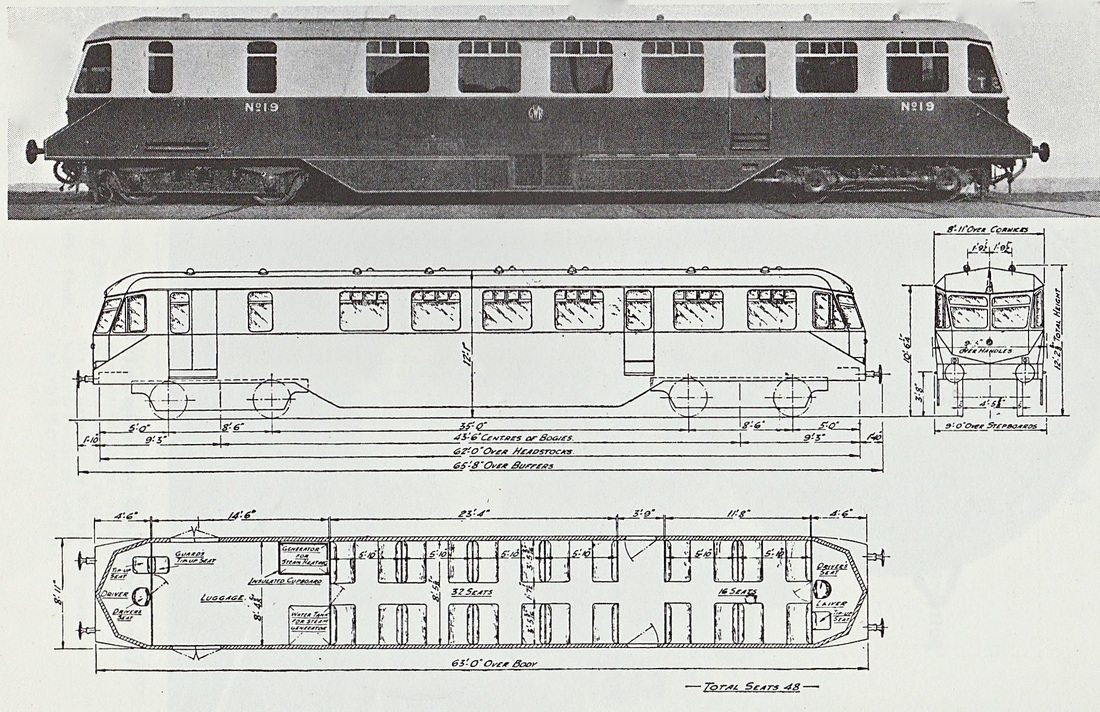
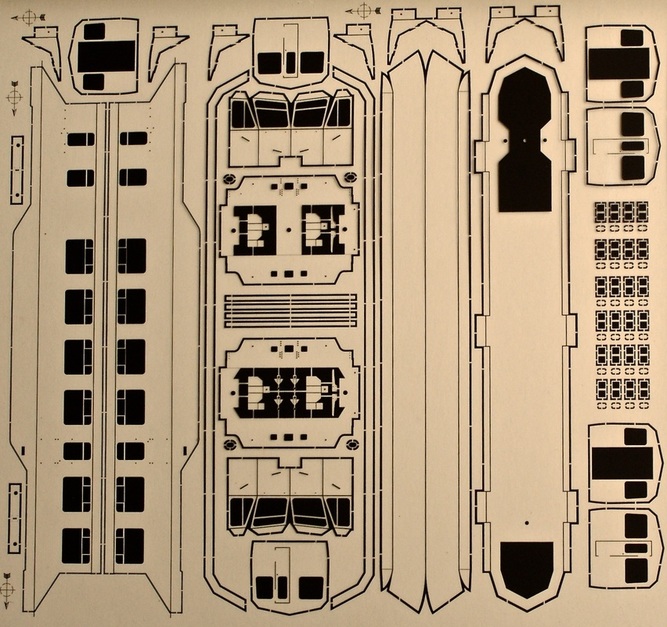
We have taken a look through some of the older 7mm scale CPL stock, and it turns out that there is a set of 3 full Collett Bow ended dining carriage etches, originally forming part of a matching train of 1929, stock built for the Cornish Riviera and Torbay Expresses.

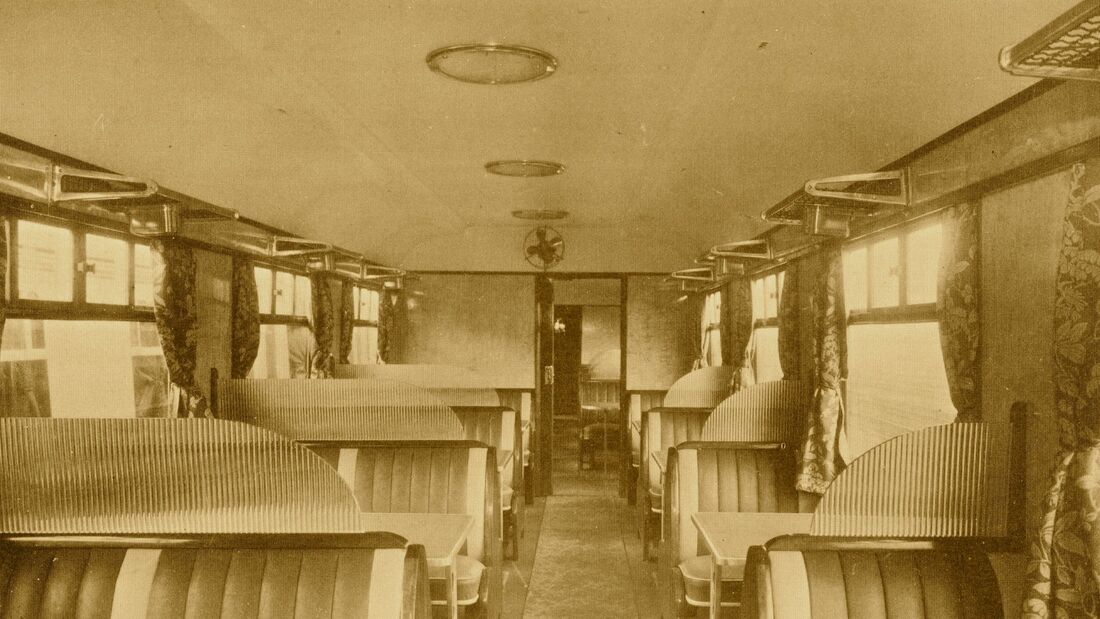
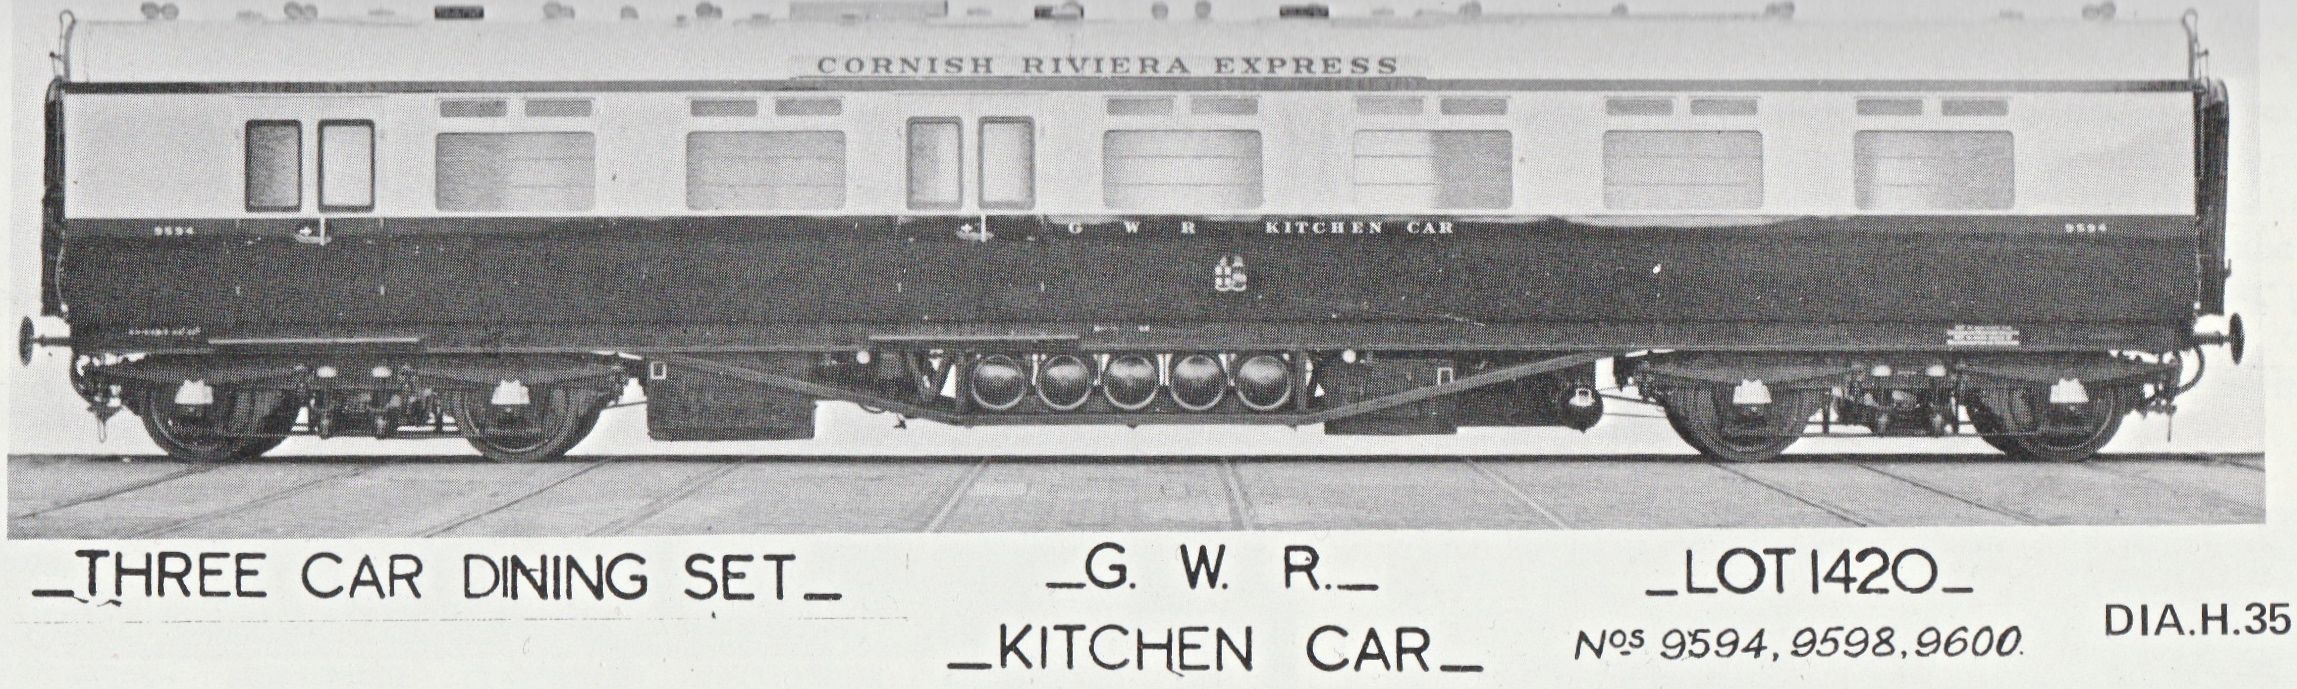
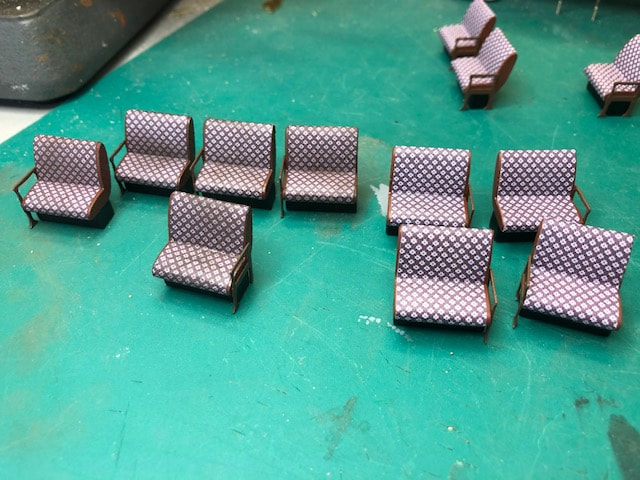
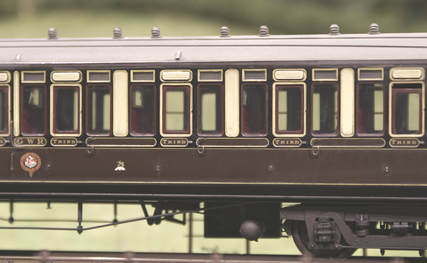
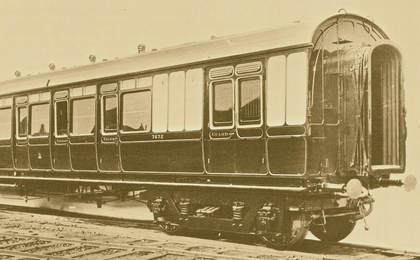
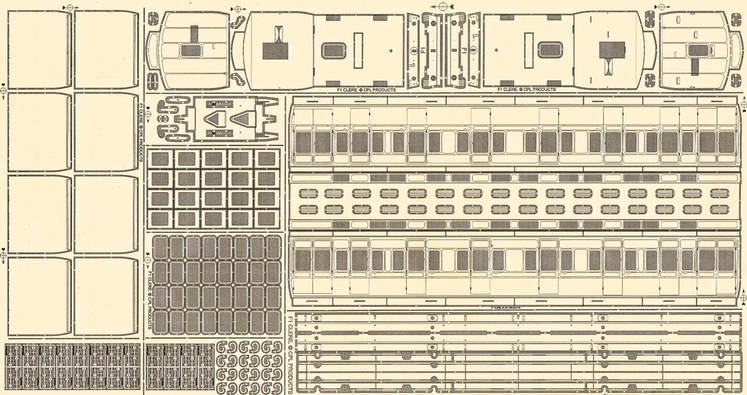
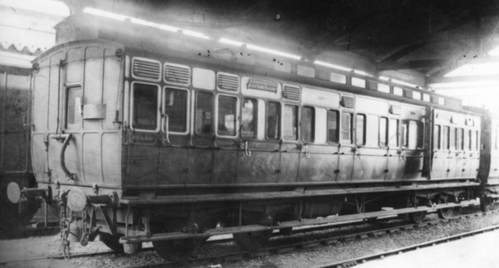
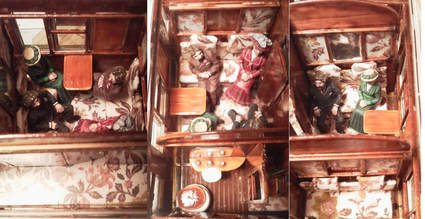
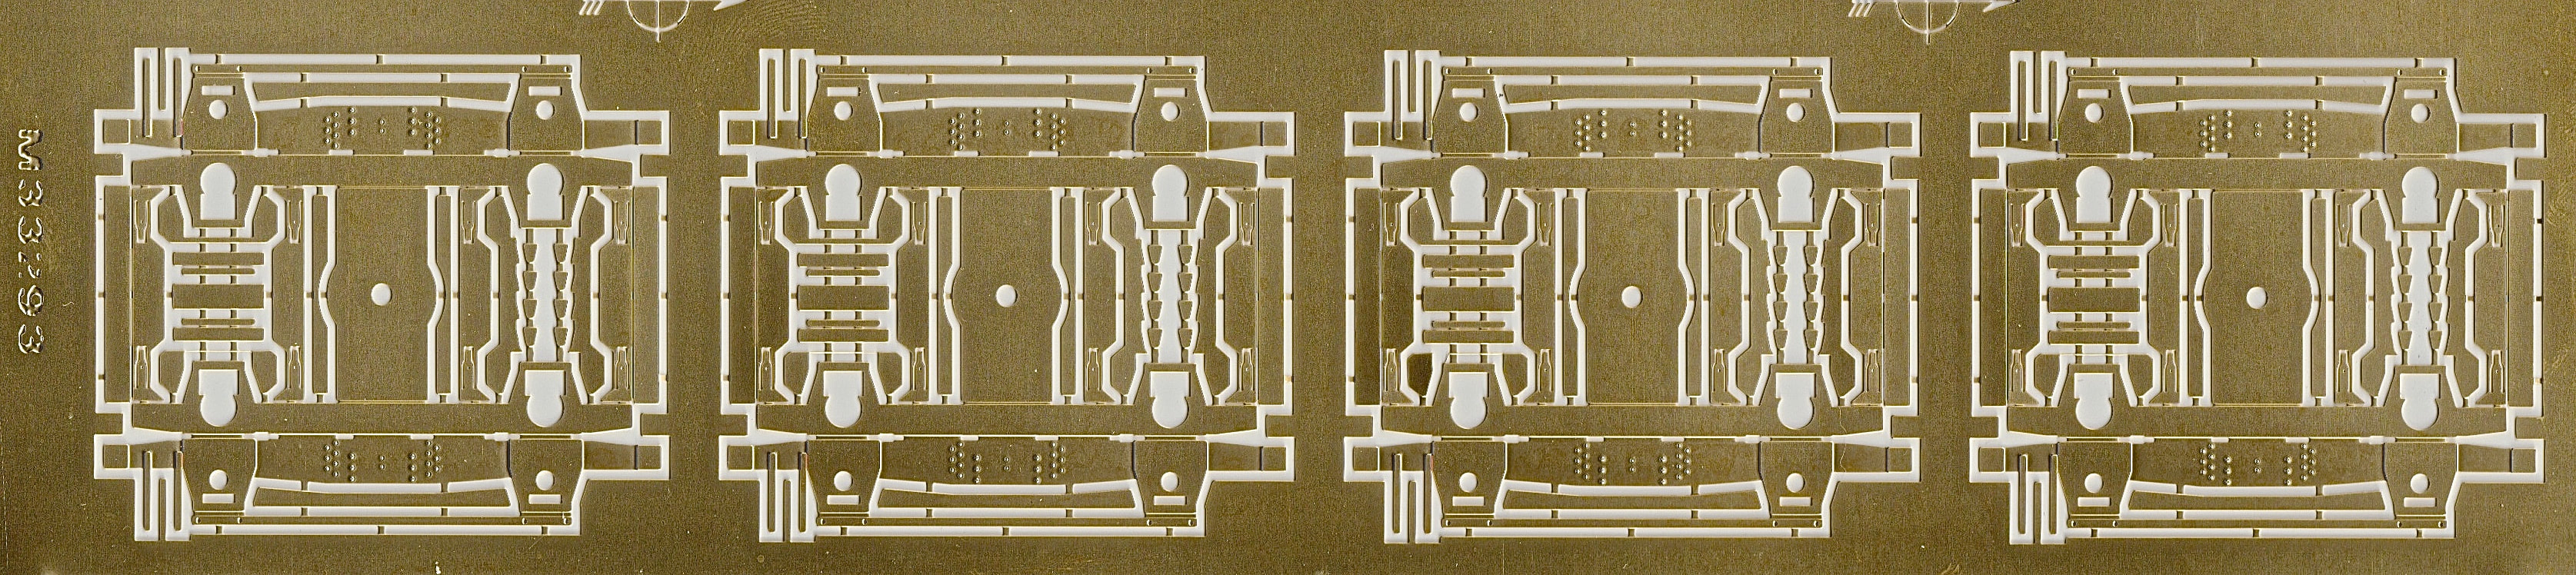
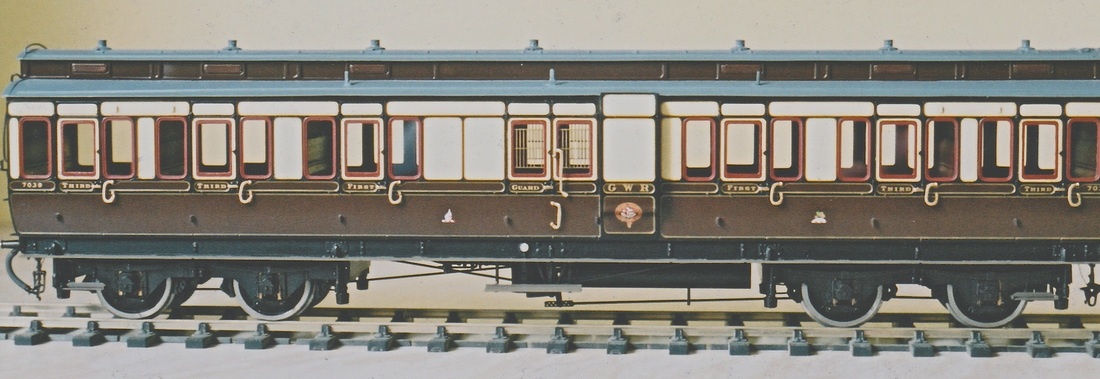
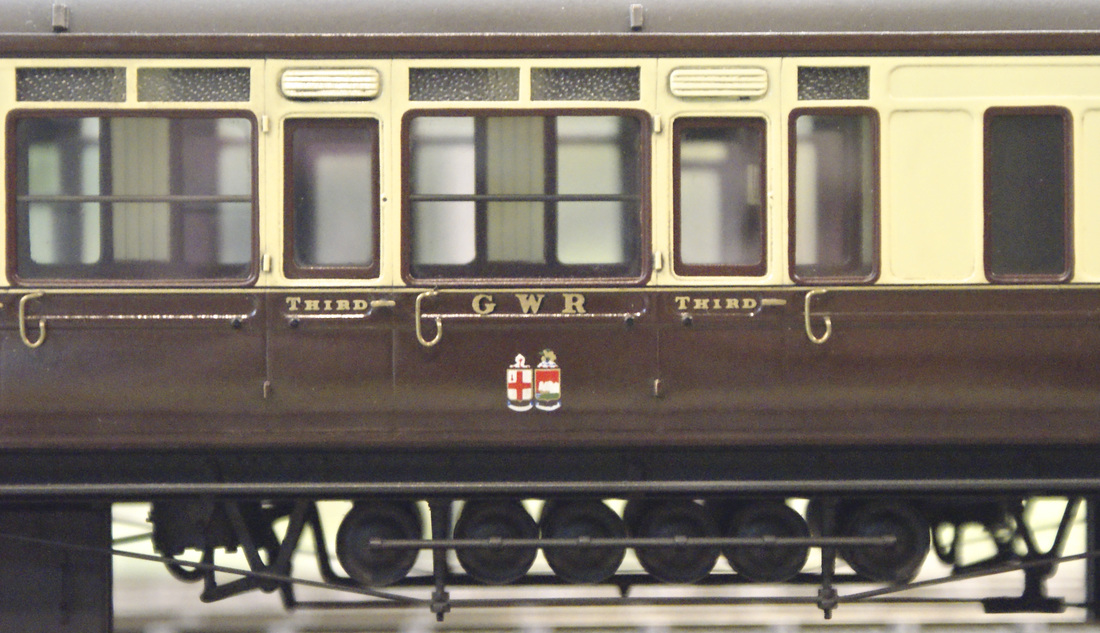
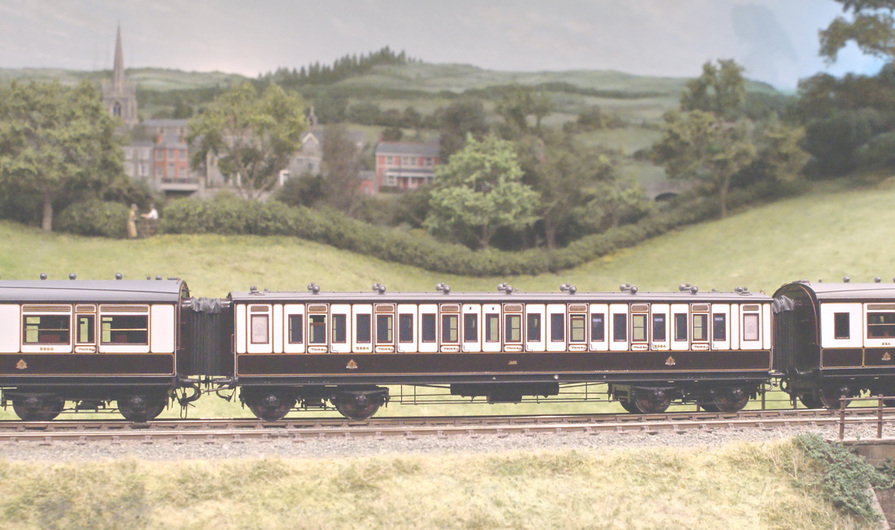
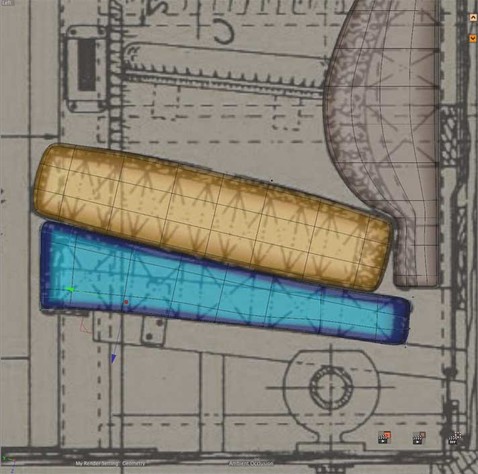
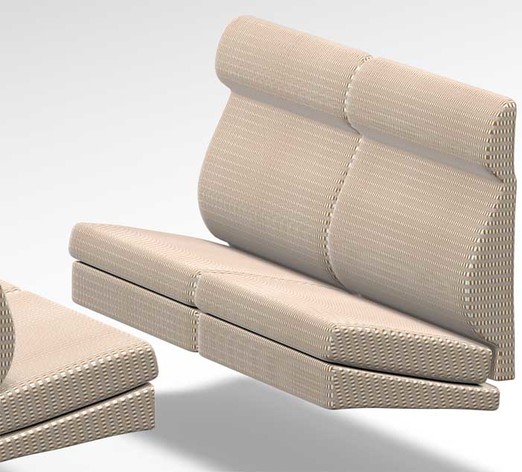
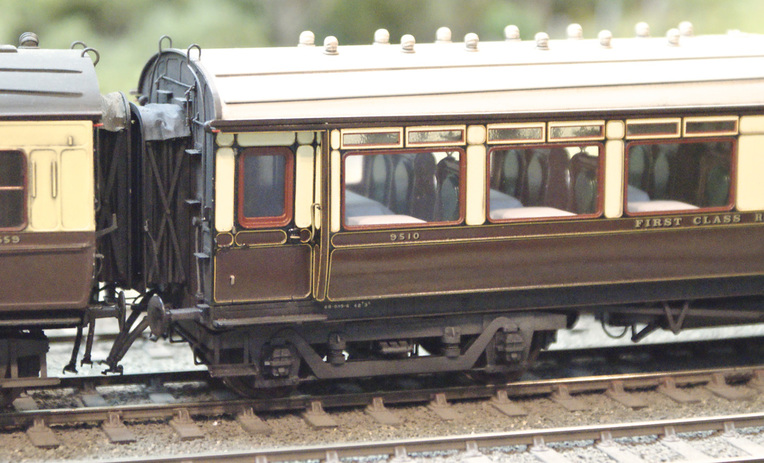
The diagram numbers for these are H35, H36 and H37. The kitchen carriage was H35, and a photograph and a floor plan of this vehicle appear here, as well as a scan of the etch to show the various components included. The two similar dining saloons were coupled at either side of the centre kitchen car, with H36 built as a 3rd class dining saloon (a picture of one of the modern interiors is included here). H37 was the composite diner which actually had the same body sheet metal and windows, and these included seating for 32 passengers with a 1st class saloon seating 16 of them. The first class tables were provided with a table lamp with a red shade and antimacassars on the seat backs.
The interior view shows the full third dining saloon, number 9586 with the flat centre panelled ceiling, modern style flowery curtains, and an overhead fan for hot days.

|
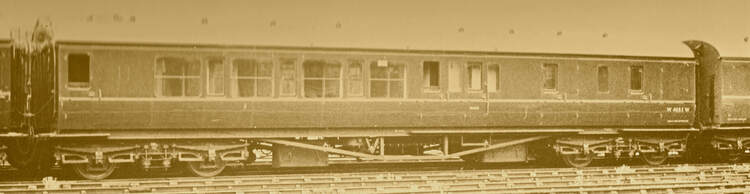
As times changed, there was reduced need for all the seating capacity and by 1932 the sets on the CRE and TE were replaced by the H39/40 pairs, mainly due to the extra weight of a separate kitchen car over the Devon banks. The H35/6/7 moved elsewhere, often seen on the Birmingham route.
|
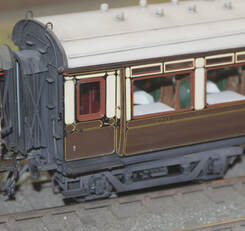
All the etches have the same set of components to detail the bodies, and the windows are half etched from behind allowing the very fine flush glazing to be successfully reproduced. For reference these etches are not suitable for the last years of service as the main windows were all replaced by Mark 1 types by 1952.
The usual components to finish the carriages include the usual buffers, pipes, hinged tommy bar couplings and corridor connections. The recessed doors and chromed handles fitted as standard to the 1929 stock can be reproduced with polished stainless steel strip, which we have in stock as well.
|
There are spare sides and other components available, in fact there are nearly two complete sets, and judging by the reference it would appear that they can be quite easily finish painted into GWR livery as illustrated here. All the transfers for these are available, as well as the roof vents, so they do need some research and scratchbuilding of other roof and underframe detailing, as well as 9ft bogies, but the three would make a good project for the larger layouts.
Lot 1420 Kitchen car diagram H35, with painted gold numbers, 9594 - 9600
Lot 1421 Composite diner diagram H36, gold painted numbers 9582 - 9587
Lot 1422 Diner 3rd class diagram H37, gold painted numbers 9588 - 9593
|
|
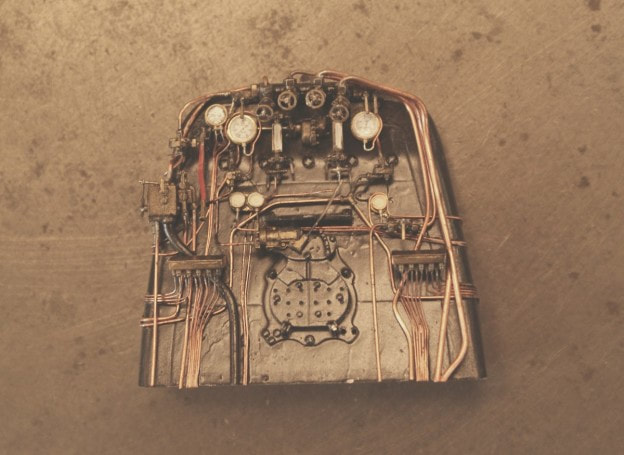
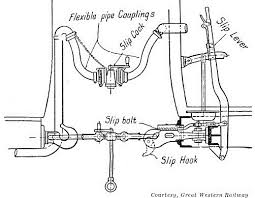
GWR Automatic Token Exchange Apparatus (Locomotive Fitting)
|
Automatic Token Exchange Apparatus was introduced by the GWR to the Minehead branch in 1934 and to the Barnstaple line in 1936. A variant of the Whitaker apparatus used on the S&DJR and the M&GN, use of the equipment was intended to increase train speeds on the lines involved thus improving their capacity during the summer months. The apparatus remained in use on these lines until they were either closed or diesel trains replaced steam traction in the 1960's.
At first locomotives of the 2-2-2T 45XX class, in the 4575 series, were equipped with the Exchange Apparatus but later tender engines, of the Bulldog, Dean Goods, 2251 and 43XX classes, were also equipped with the apparatus. All the engines so fitted where allocated to Taunton shed specifically for working over the two lines but in practice could be seen far from home - quite commonly in Oxley!
This casting represents the locomotive fitting and has been produced from a pattern made by Tony Reynalds. All that is required to mount the fitting is to drill a hole in the appropriate spot and glue/solder the casting in place. The apparatus was mounted on the fireman's side only, on the front of either the bunker or tender - as always, consult photographs to determine the correct position. Clearly, the height above the rail level had to be precise to enable the equipment to work successfully and the dimension from rail level to the centre of the receiving jaw was 5ft 6ins. As the locomotives had only one set of apparatus, all - including tank engines - had to be turned at the termini at Minehead and Barnstaple.
Further information may be found in an article by Mike Christensen in "British Railway Journal" No.34 which includes photographs and a useful drawing. Additional information - including numbers of locomotives fitted with the apparatus - may be found in the relevant parts of the RCTS "History of GWR Locomotives".
|
We do have tooling for the H39/40 set as well as the H30/32 Saloon & 3rd. The H27/29 &31 diagrams can also be done, but all these have to be ordered in advance.
Discounted to £180 plus detailing components and P&P.
|
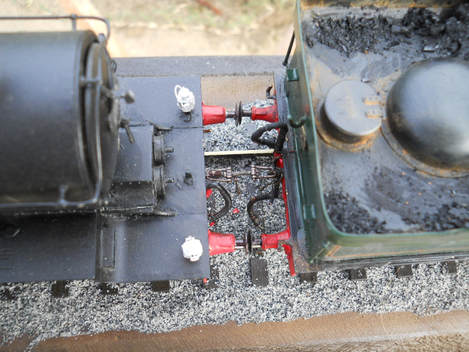
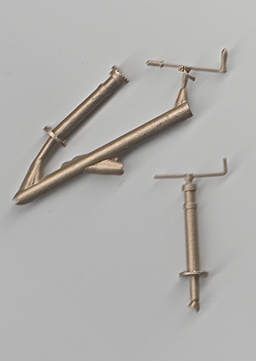
Brian Hodgson has been using our shackle and chain kit, (CPL 40), as a basis to produce some binding chains for bogie bolsters. To produce one set for a wagon, he used the components from two kits to get enough hooks to produce a complete set, as each binding chain is made up of two different weights.
As seen in the illustration, one of these contains just one hook and the other uses three. |
|
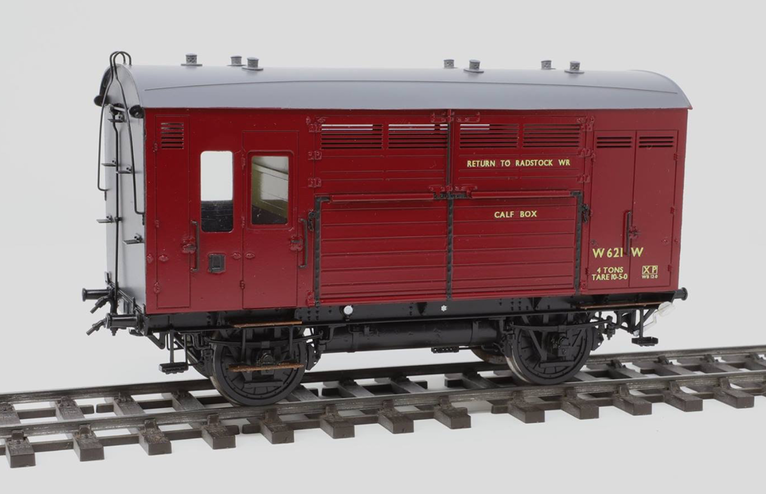
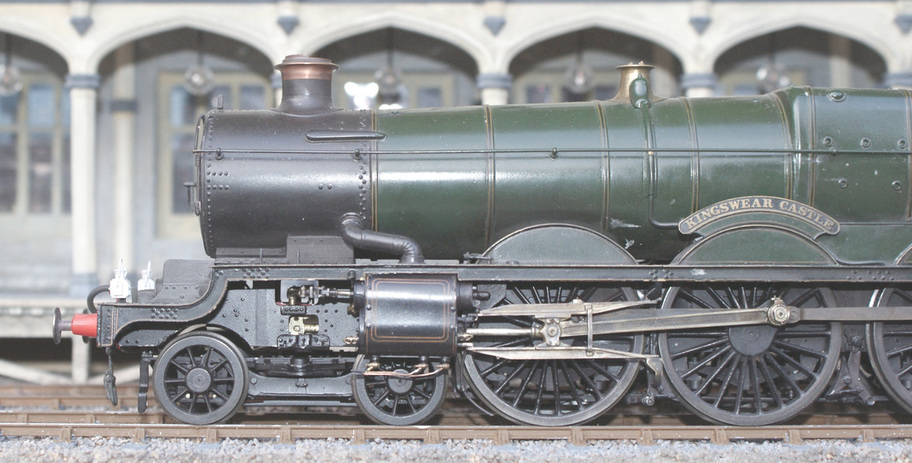
A little while ago, Tony Geary took on a CPL 7mm scale Diagram N16 and also obligingly researched the correct type of lamp top which we didn't have. As always with Tony's craftsmanship, the end result is stunning. Here's a good photo which appeared in a post on the O Gauge Scale Modellers Facebook page. Tony's build was painted by Paul Moore.
We do have a few of these in stock and they will be coming complete with lamp tops next time! I'll speak to Tony about the only other missing components to complete the job as soon as soon as I can get round to it.
|
|
While we are speaking about the N prefix for horsebox diagrams, it might come in handy here to list the other typical GWR diagram prefixes with their according vehicle types.
|
A – Bogie first class
B – Bogie second class C – Bogie third class D – Bogie brake third E – Bogie composite F – Slip G – Saloon H – Catering vehicle |
J – Sleeping car
K – Brake van L – Mail van M – Bogie parcels van, etc. N – Horse box O – Milk van P – Carriage truck |
Q – Inspection saloon
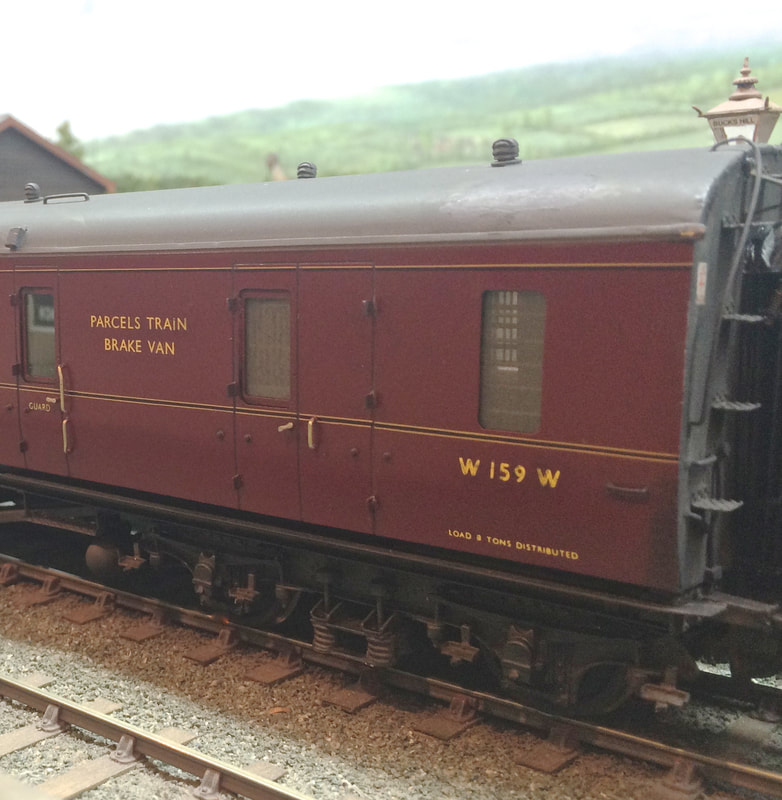
R – First class S – Third class (ex-second) T – Brake third (ex second) U – Composite V – Brake van W – Parcels van |
|
Kevin Wilson's 1904 Diagram L Steam Railmotor Trailer has now arrived, and we are looking forward to seeing that progress. Following the research undertaken by the GWS at Didcot we have supplied the material for the tram type seats and Kevin has upholstered the cast seating. Photo by Kevin Wilson
|
|
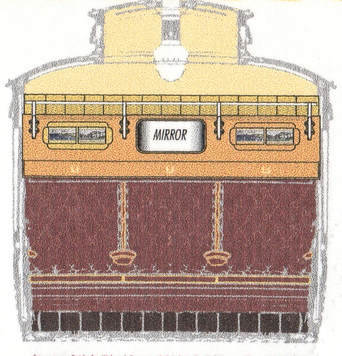
We also thought that it might be an idea to publish this diagram here to help anybody detailing their carriage ends to pick out the correct telltale arrangement. Of course, reference can sometimes be difficult, particularly with compartment carriages as one side is nearly always obscured by the corridor connector. But the top three corridor arrangements in the layout should help. Below are the non corridor suburban and branch line vehicles. Along with bufferbeam steam and vacuum pipes.
|
|
1904 Panelled H8 Dining Carriage Etch in 7mm
The longest of all the GWR coaches, were the 70' 'Dreadnoughts' and these impressive vehicles did feature some American design influence. The first vehicle in this well known series was the 1904 dining car built to diagram H8, which took the full width of the loading gauge and was made to the greatest allowable length.
These carriages featured first and third dining saloons at either end with a well equipped kitchen between.
A new chassis was designed with strong, light steel girders and the original 9' wheel base volute bogies were soon replaced by American design bogies with the same wheel base. These coach bodies were unusual in that, as well as being very large, there were only doors at the ends and centres of the vehicles, even leaving the compartments of the first and third class carriages without the conventional central access door.
|
|
|
Please do get in touch if your Edwardian rake is missing a suitable dining carriage. As usual, we can also supply many of the components needed to finish the build, it's the 1904 version and it comes with a separate underframe etch, corridor connectors, 9' American bogies, snail roof vents, steam and vac pipes couplings. It's worth noting that as well as the Tommy Bar couplings, these also were originally fitted with multi link safety chains shackled to the buffer beams. A few pictures accompany this to illustrate the final appearance. Please do get in touch if you like the look of it and would like any more details, and also visit the review link below
www.raymondwalley.com/carriages/gwr/dreadnought.html
www.raymondwalley.com/carriages/gwr/dreadnought.html
Because of the variety of shackles and trunnions on the CPL coupling kits, we sometimes get enquiries whether we can assemble coupling types from other railway companies, and here are a couple of examples
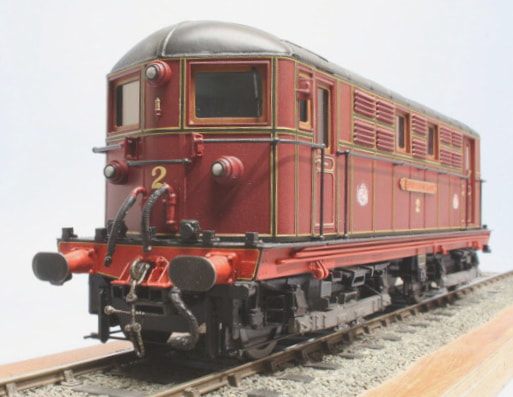
Ken-de Groome's superb Metropolitan Railway Bo Bo uses a modified CPL coupling.
|
Cambrian 3-link & loose screw coupling just supplied for a private scratch build.
|
By all means get in touch if you have a pre-grouping, or foreign design that differs from the existing kits, and we'll see what we can come up with.
Although nearly all the carriage equipment is done to 7mm scale, we can supply some 4mm scale etches, some of which may well come in handy for the scratch builders among you. I'll make a list below of these below.
|
4mm Etched Accessories
We have...
Twin 4'6" GWR underslung battery cabinets GWR 9' suburban bogies (require axle guards) Clerestory panelled ends with steps Auto trailer steps etch Droplights GWR carriage buffer beams with overlays |
And limited stock of...
Dreadnought end doors 1 pair clerestory corridor carriage ends Under frame brake v hangers Under frame brake gear with clevices and cranks Here is also a list of 4mm transfers for both locomotive and carriage as well as limited stocks of cab gauge faces.
GWR shirt button roundel yellow GWR buffer beam numbers 'Great Western' locomotive lettering with coat of arms between Separate coat of arms for carriage lower panelling Late Sans Serif 'camping coach' Early yellow 'buffet car' |
|
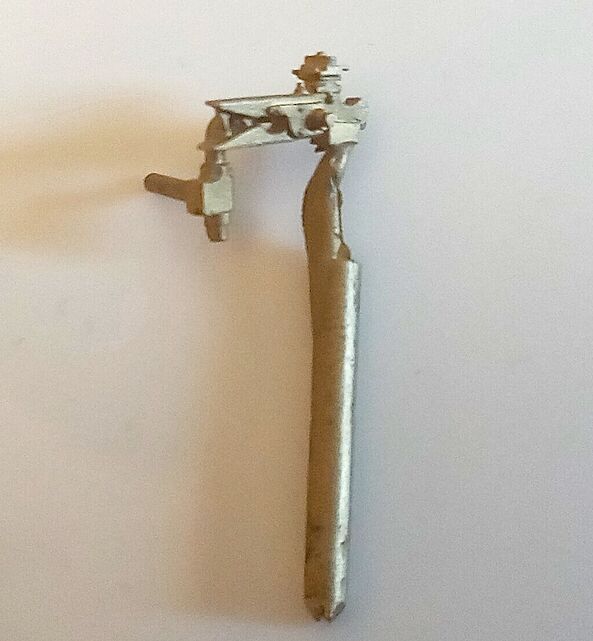
The CPL No33 Diesel loco screw coupling is in stock, and Ebay listed, but please do check your reference if you are doing a DMU with screw shackle couplings, as these were very often fitted with the earlier conventional single forged top link instead of separate pinned drop links (see pics)
|
The separate top links appear on the top left of the sprue just below the coupling hook.
|
In order to obtain greater passenger accommodation, the GWR built a great many different types of trailers to pair up with the new steam rail motors and later auto trains. We do have a few of these listed as 15 thou etched sides, ends and other components in 7mm scale, and they can be found here on my newly designed etch list:
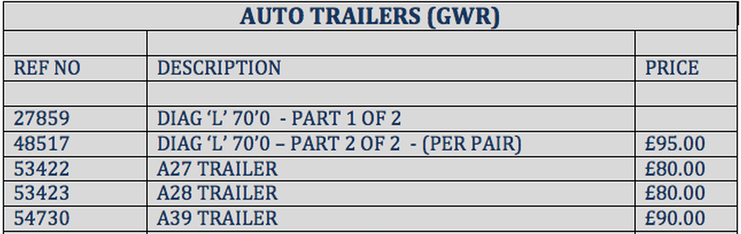
Here are a couple of scans of the Edwardian GWR trailer Diagram 'L' , which a few modellers are now beginning to build as part of one of the original combinations of railmotor and trailer. The first six of these 70 ft vehicles were constructed in 1906 as lot 1108 and numbered 29-34, and they do differ to the much shorter Dapol Auto trailer which is to Diagram N of 1907, and again to the Great Western Society' restored 1912 steam railmotor trailer No 92 which is 70ft, but is built to Diagram U.
The Wikipedia resource, has quite a useful reference table that goes some way to help identifying these, while also dating rebuilds as well, which continued well into the BR period and the mid-fifties.
The 'L' tools have just been dispatched for a new batch to be made, so let us know if you would like one, and Trade enquiries are most welcome. Please do bear in mind that we have Diagram L and A27 Trailers in 4mm as well, so email or call whichever you prefer.
|
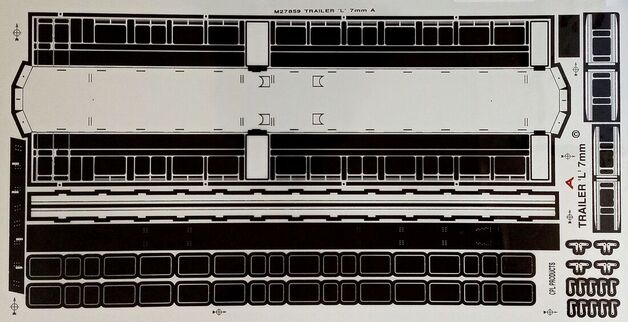
Trailer L Part 1
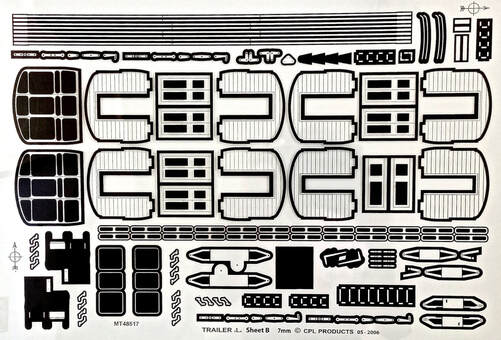
Trailer L Part 2
|
Hope you are all ok. Just to let you know, we have had a few telephone enquiries wondering whether we are still open for business. So I thought that I would let you know that we are planning to do a CPL send every other day as a temporary measure until everything settles down again.
Do please note the new arrangements regarding method of ordering, just to make everyone's life easier. https://www.cplproducts.net/contact-form--price-list.html
I have also now included our newly sourced GWR white metal bogie sides in 7mm to the price list and they are numbered 126 - 131.
We're fine and waiting for the lock down restrictions to ease up, so if you're stuck indoors and you do need any CPL kit we are happy to send from our little local Post Office which is also fine. Please bear in mind that there are no scheduled show appearances for CPL until Telford in September and High Wycombe in October.
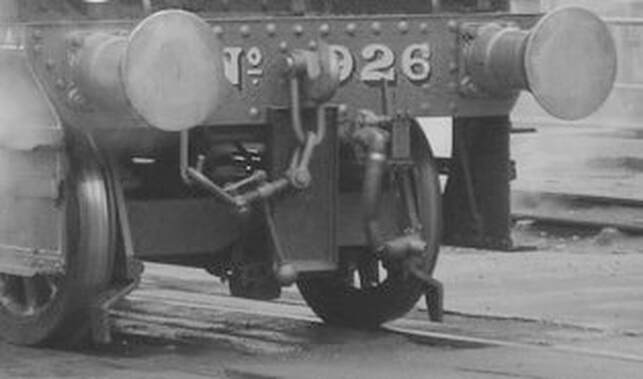
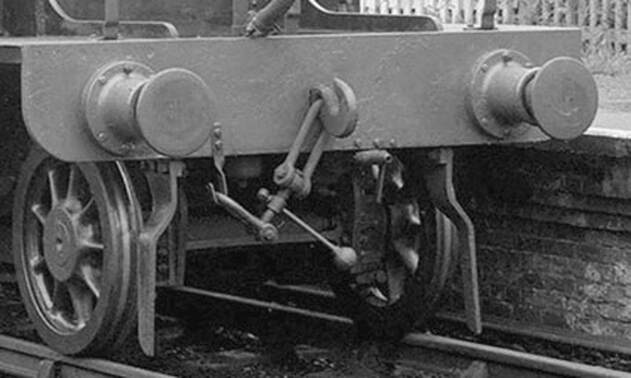
Southern Railway Locomotive Couplings
We found a component line view of the Southern Railway early 2 and later 3 link locomotive couplings, with the major difference being the additional top 9 1/2" shackle, this was actually quite similar to the screw couplings fitted to the Metropolitan Railway, Metro Vickers Bo-Bo electric locomotives that ran until the 60s. For reference, the early 2 link versions were typically seen in the pre Maunsell era, while the 3 links appeared from then to the Bullied period. As always please do confirm with reference if you are in the process of a Southern Railway build.
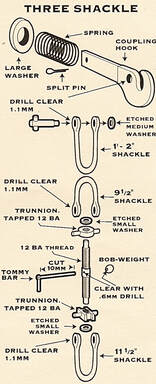
The Three Shackle Coupling
|
This style was fitted to all new construction commencing with the 'Q' class and the subsequent 'Q1', MN, and 'WC/BB' classes. Photographs confirm that this configuration was in use by 1937 and was progressively fitted to all extant SECR and SR locomotives by the mid-1940's. Ex LBSCR 'K' and 'C3' also received this style of coupling, possibly other, but not all, Brighton classes as well. From 'known' records they were not fitted to any ex LSWR loco's.
|
|
|
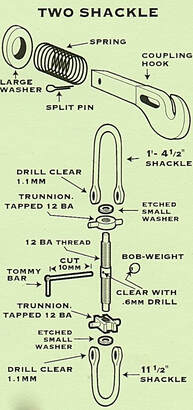
The Two Shackle Coupling
This style of coupling was used on S15, N15, H15, and maybe some others at a later date.
|
|
We now have stock of the rectangular framed third class partition overlays, so if you have any interior detailing projects planned, we can cover that.
|
|

|
Quite a few builders are currently looking to do their own GWR steam rail motor at the moment in 7mm and we are looking forward to seeing them come together. We don't supply these vehicles, only some of the parts for them, and in due course will be equipping Kevin Wilson's forthcoming Kemilway/Scorpio build which can be followed on his G.O.G blog page.
|
We do have the accompanying trailer as a 7mm CPL etch, so if you happen to be following Kevin's and would like to add it to your build, please let us know and we'll get a few on the go.
Hi everyone, hope all your building projects are going well. Only a couple of things at the moment to update, we'll get back with any other news a.s.a.p. Don't forget to send in any photos that you're happy with for publishing on the wonderful web. See you soon Michelle
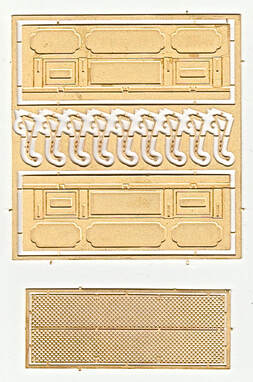
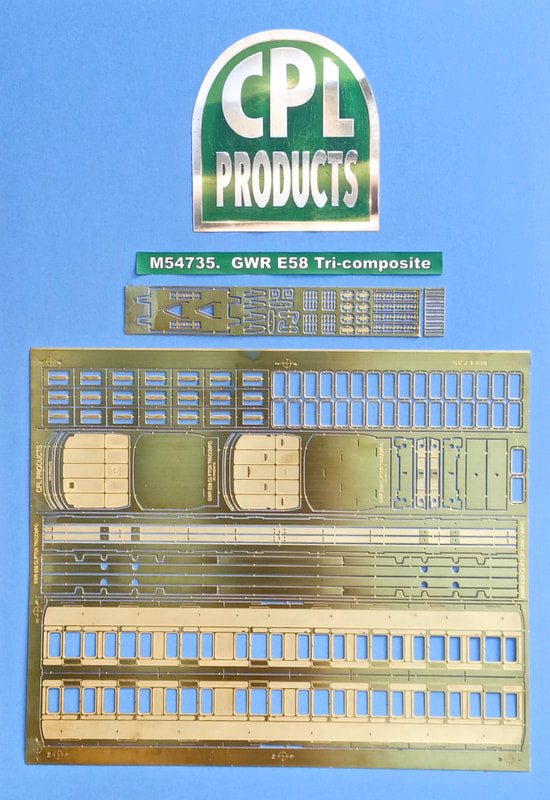
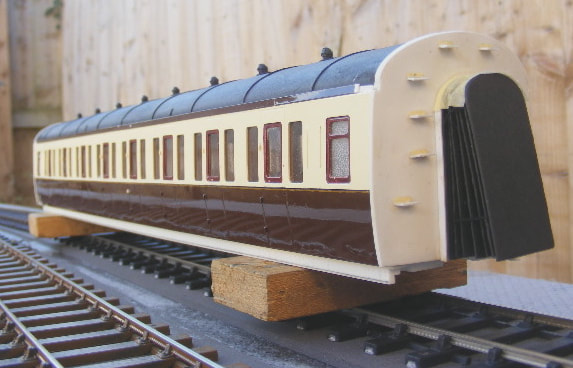
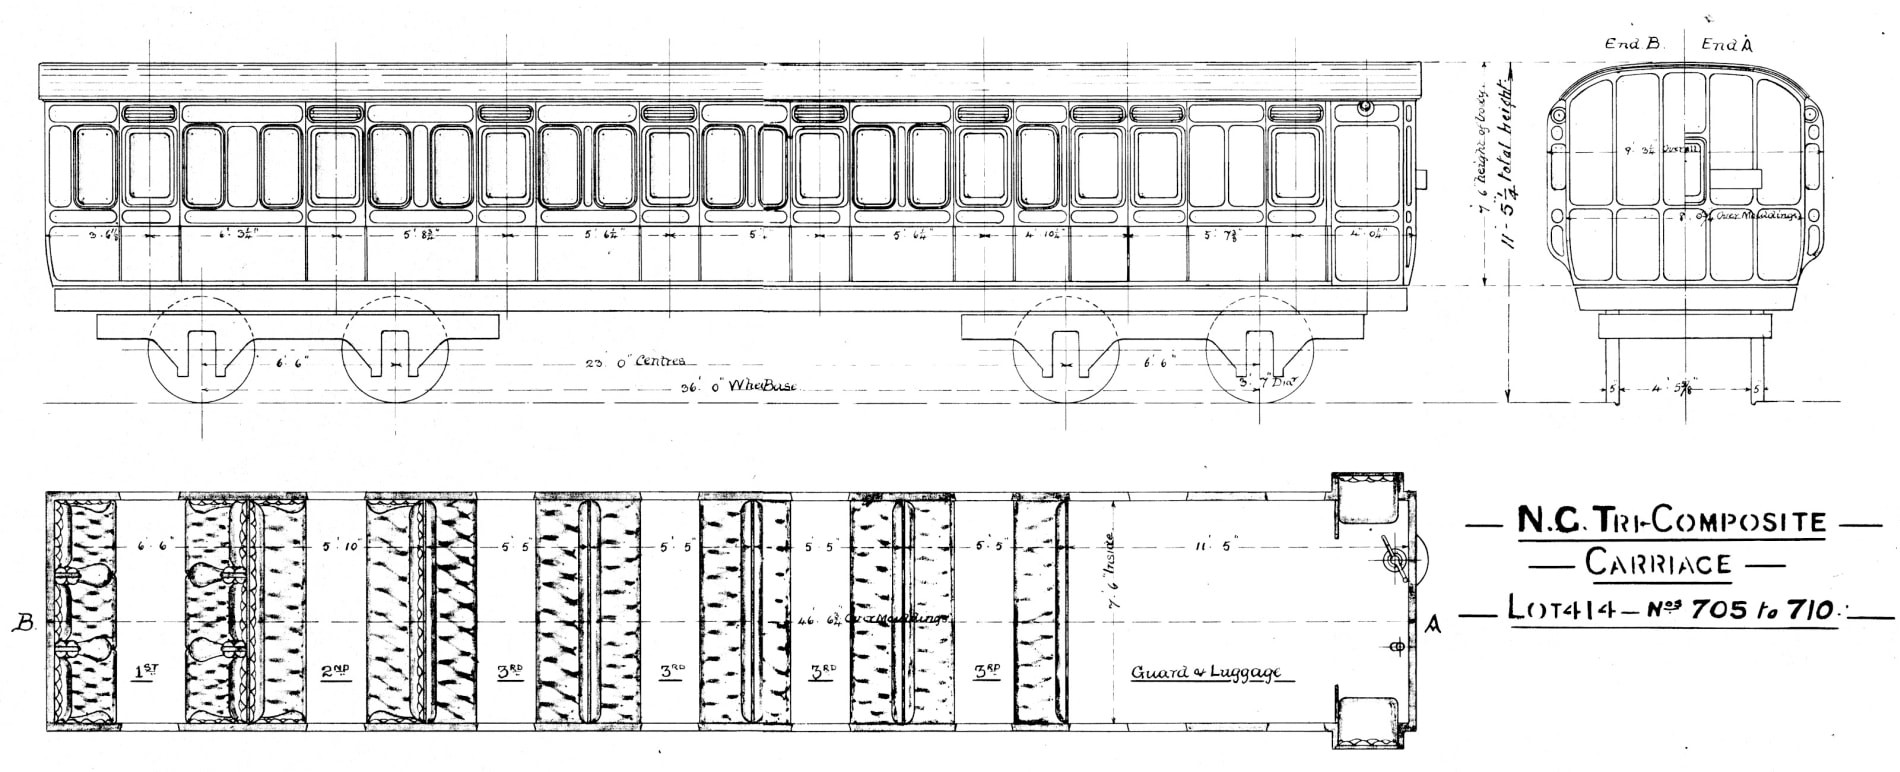
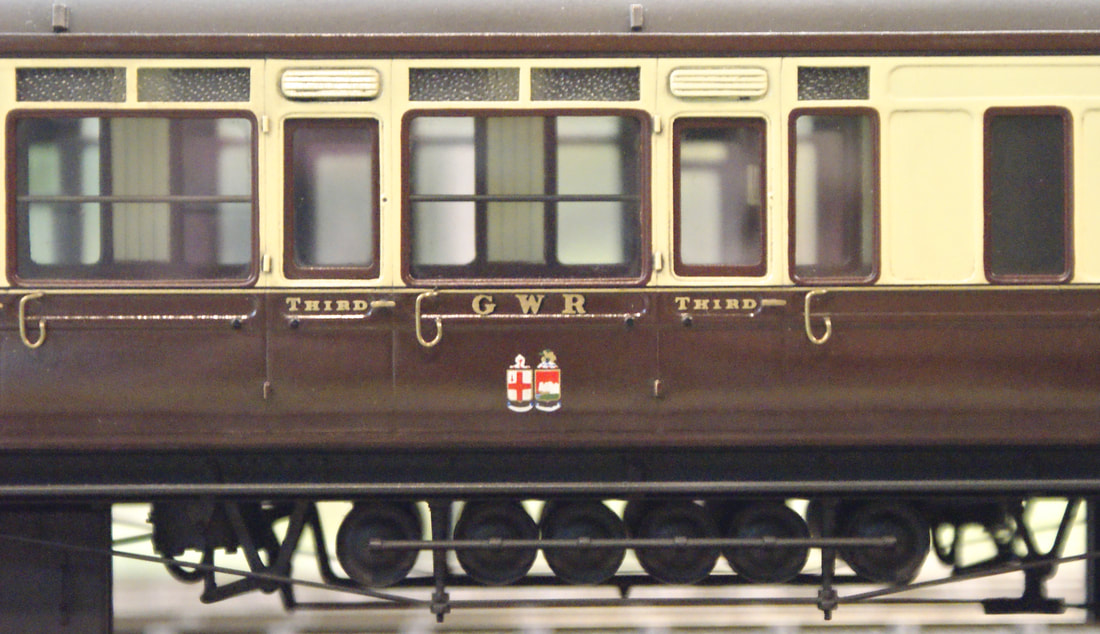
We have one demonstration etch in 7mm scale of an 1898 Clifton Downs Tri-composite carriage. This was one of four 50' x 8' low roofed panelled carriages originally running on 8' 6" Dean bogies.
|
SOLD
|
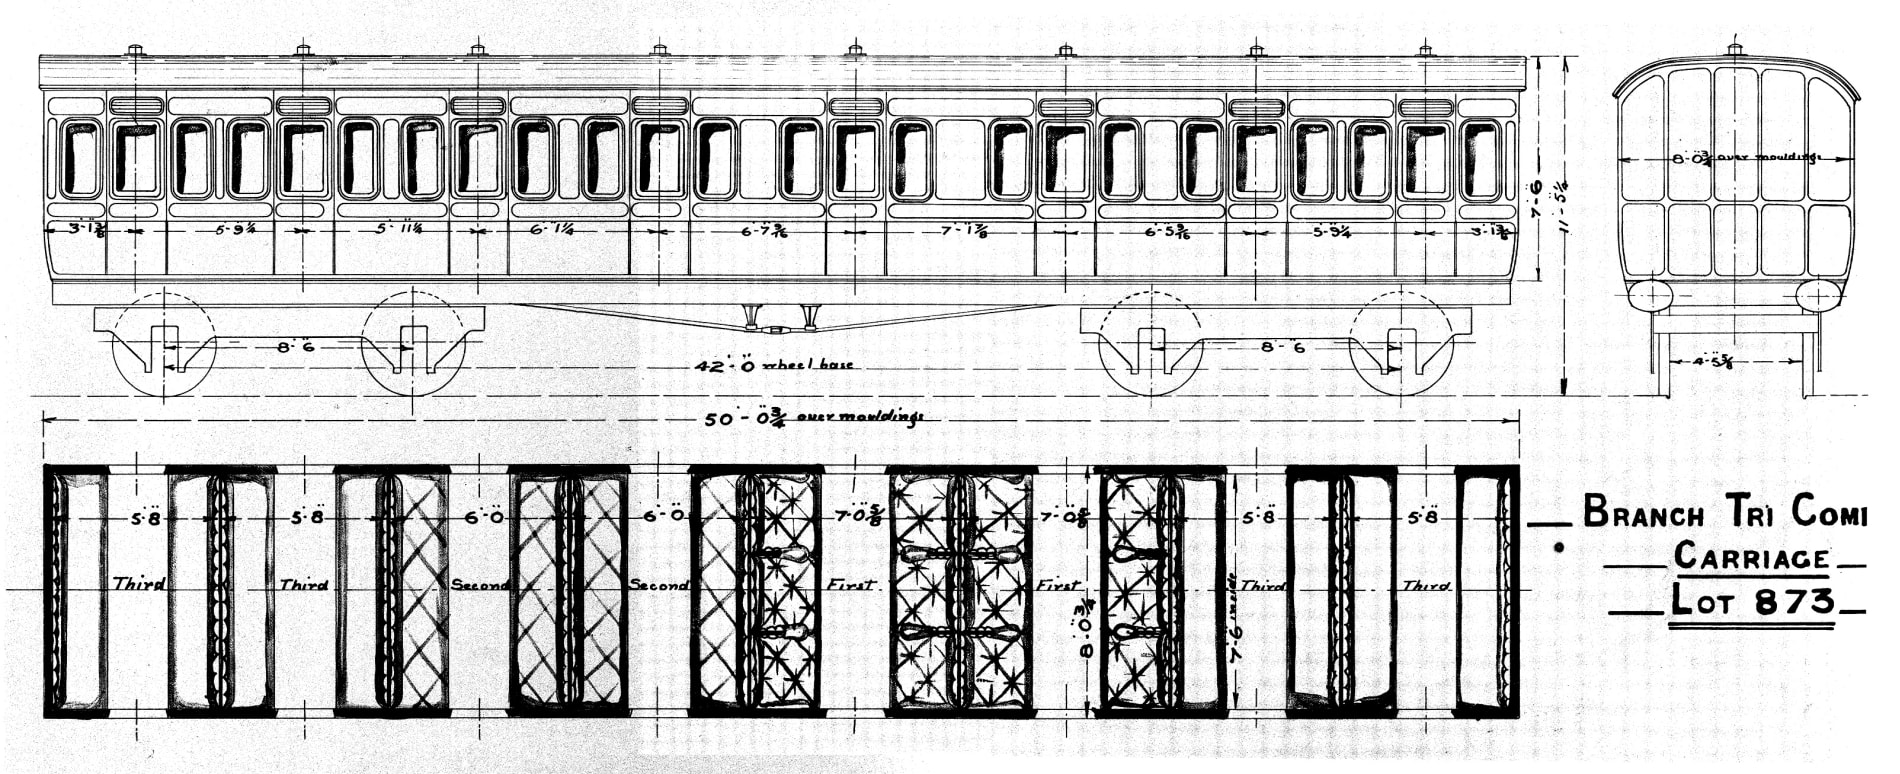
It comes with an underframe kit, V hangers, brake clevises, hinges, door stops, end steps & bolection mouldings. We will eventually be able to supply this carriage with drop lights, couplings, Dean oval head buffers, vacuum and steam pipes and all the interior components including 3D printed button benches and squabs for the first class. Please do get in touch if you like the look of it. We can do the whole thing for £75 plus p&p and any fittings that you might need from our stock.
|
|
Thanks to Alan Dale for sending photos of his latest work. Alan is primarily a scratch builder as are many CPL customers, but he has opted to use the full range of interior components for these wonderful carriages, including 3rd class partition overlays and luggage racks, door pull straps, pictures, maps and corridor sliding door handles as well as telltale, steam and vacuum train pipes.
They will also feature CPL 31 hinged tommy bar screw couplings and 7' CPL bogie sides. Alan is using the rear mounting pads on these particular bogie sides, but please do bear in mind that there is a choice of just flat backed cosmetic white metal overlays if preferred. It's an option that we can do at no extra cost. |
|
Just a couple of things, firstly to revise the advice on the order form to enclose cheques and payments in advance. If you are considering placing an order, please contact us via the usual email channels or give us a ring first, because the trouble with cheques in advance is, if that an item happens to be temporarily out of stock the whole thing has to be amended. For everybody's convenience please get in touch first of all and we'll make sure that every thing is available before calculating a total fee.
We keep getting asked for BR era Coach transfers, so we are working to source a range of these. Once we have got a few scans to show these we'll post them online.
7mm Etches
We are going through the post show stock, and we still have a few lovely 7mm scale complete etches. I have listed some of the complete ones below as they are particularly nice, and I thought you may like to take a look.
D121
I really like the look of this Bristolian 61ft D121 Brake Third etch in 7mm. This is a pretty straightforward carriage to paint and line, and there are waist transfers and GWR shirtbutton logos for the 1930's brown and cream livery.
|
In addition to the new 9ft pressed steel bogies in either sprung or rigid versions, there are the usual components in stock to help the build, such as couplings, buffers, corridor connections, 4'6" battery boxes, jumper cables, door handles, tell tales, steam & vac pipes.

|
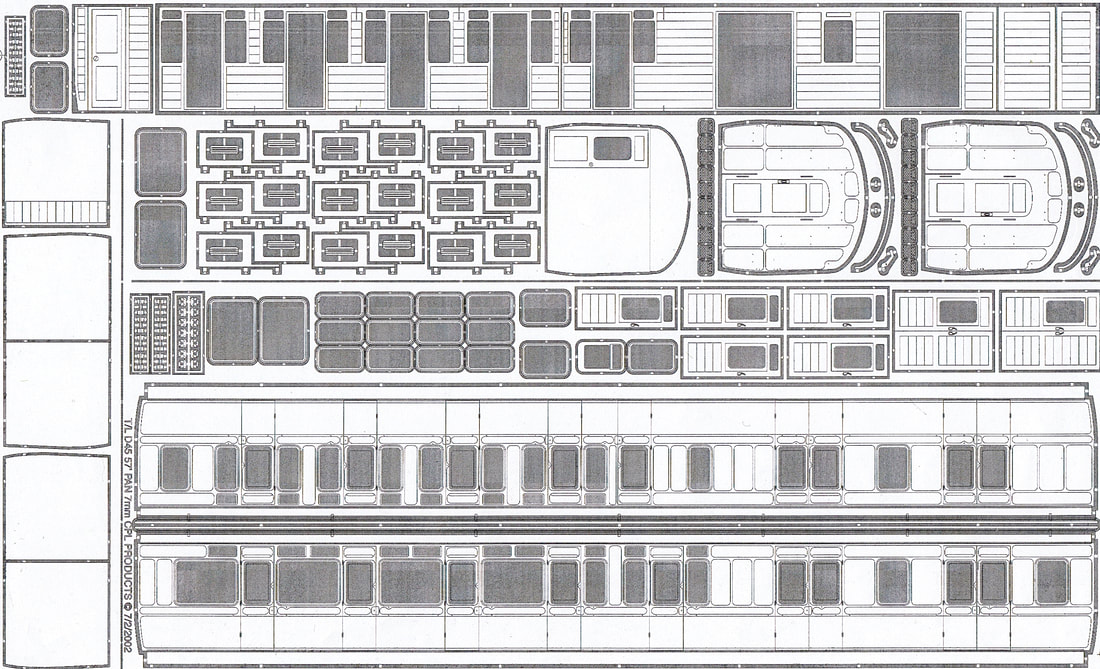
D45
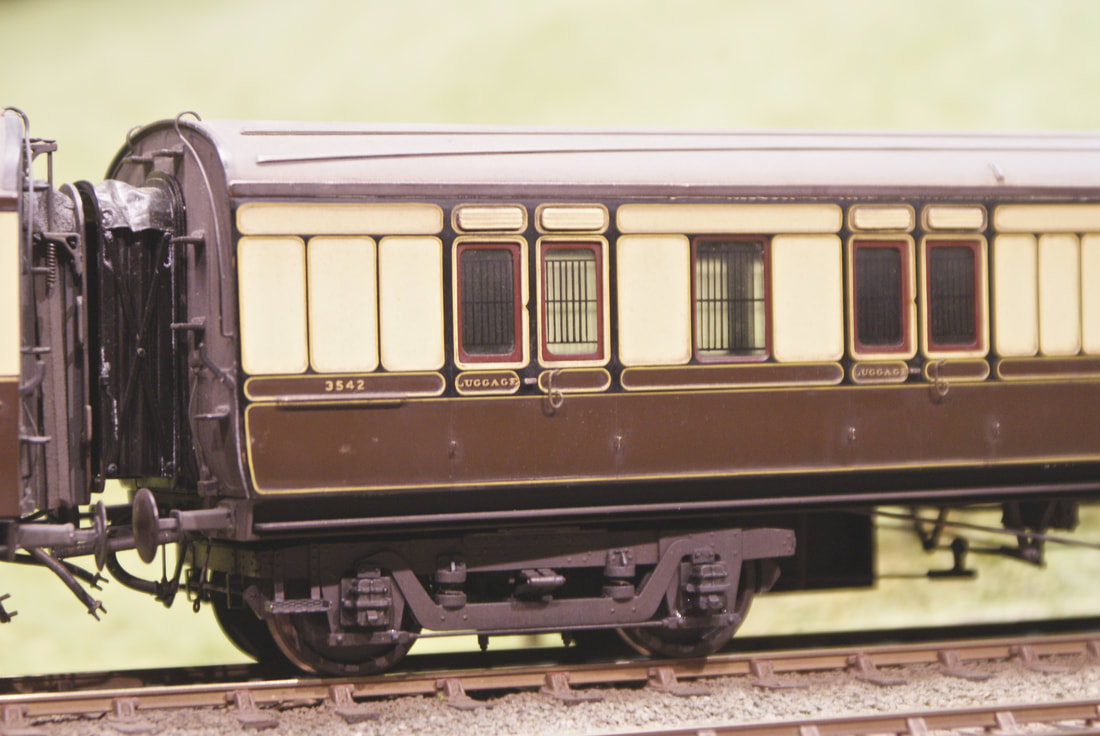
We have a complete 7mm etch for a D45 Toplight 57' Brake third in excellent condition, including a planked corridor partition with separate sliding doors and half etched catches. There are separate bolection mouldings, chequered end steps, exterior door hinges, door top vents, droplights, & lamp irons.
We have a complete 7mm etch for a D45 Toplight 57' Brake third in excellent condition, including a planked corridor partition with separate sliding doors and half etched catches. There are separate bolection mouldings, chequered end steps, exterior door hinges, door top vents, droplights, & lamp irons.
|
No 3542 (shown opposite) is a D45 Toplight Brake 3rd in the early lined garter crest livery. The additional components to finish the job are nearly all CPL now, with jumper cables, tell tales, plate glass and corridor connections as well as interiors with prints and maps beneath mesh luggage racks featuring ornate brass brackets,
|
|
|
The 57' underframes have pre rivetted bufferbeams and solebars & can be supplied with square shank buffers, flexible steam and vac train pipes and screw couplings. The cast queen posts and etched battery boxes are available as well as etched cranks and pull rod clevises.
American bogies can be supplied in either sprung or rigid versions if necessary. |
E19 Tri Composite
The E19 is shown in this drawing with it's single first class compartment clearly visible at the right hand end. The N G. on the drawing denotes Narrow Gauge, and the inclusion of a second class compartment put it into the brake composite classification and the E series of diagrams. The small droplight in the brake end of the vehicle and the handbrake stanchion alongside shows that it might possibly have been used for early slip working.
Slip carriages first operated in 1869 on the Flying Dutchman where a coach was detached at Bridgwater on the down journey and Reading on the up. It was a practise that developed on the Western and continued until 1960, although saving time on Express train schedules it was rather an expensive luxury as each slip had to be complete with a senior guard who was responsible for his own section of the train.
Underframes in stock
For the first time, we have a complete set of underframes, so if your project is missing one, I'll just list them here before we get on to the next item.
For the first time, we have a complete set of underframes, so if your project is missing one, I'll just list them here before we get on to the next item.
|
We have Dreadnoughts, Concertinas, Toplights and Mainline and City. These all feature solebars, bufferbeams, clevises, v hangers and trusses. We'll also be getting Queen Posts next month for those of you that need them.
|
|
CPL Bogie Update
|
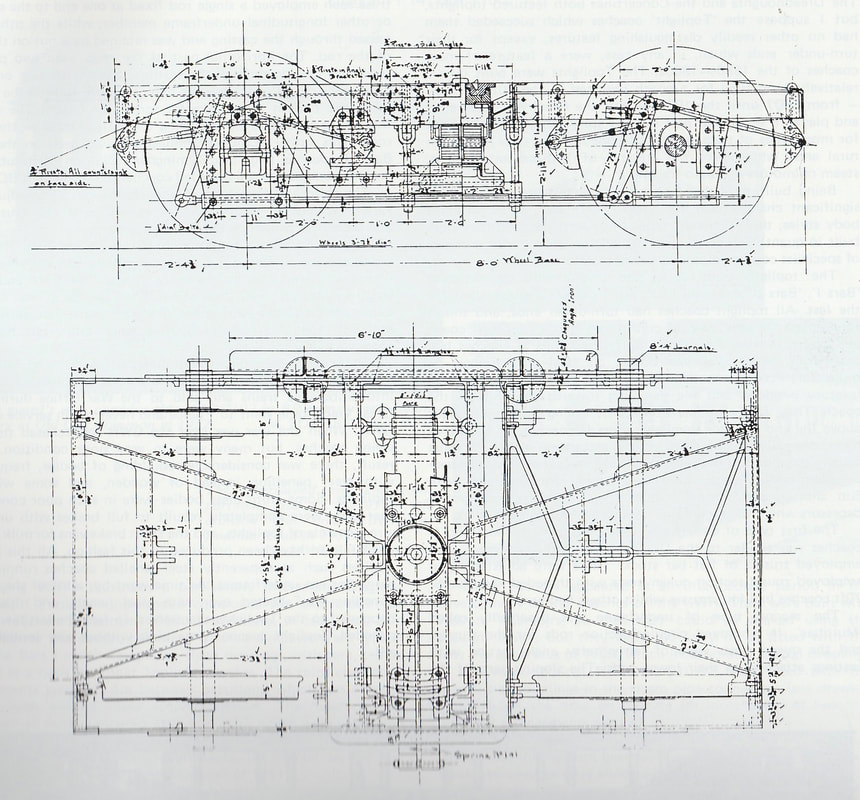
These are the Swindon drawings of the GWR American type 8 and 9' passenger carriage bogies and it's clear from the right hand cutaway sections of both that the brake crank and pullrod arrangement has been reproduced on the etch fret pictured below.
|

|
|
This etch is now available and as can be seen it does include the brake block spreaders and cranks. It's actually designed for the shorter 7' bogie, but it still might come in handy for the American inner framing and brake arrangements.
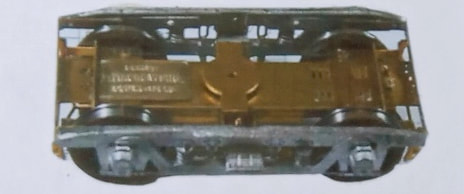
Sprung American bogie by Raymond Walley
|
|
|
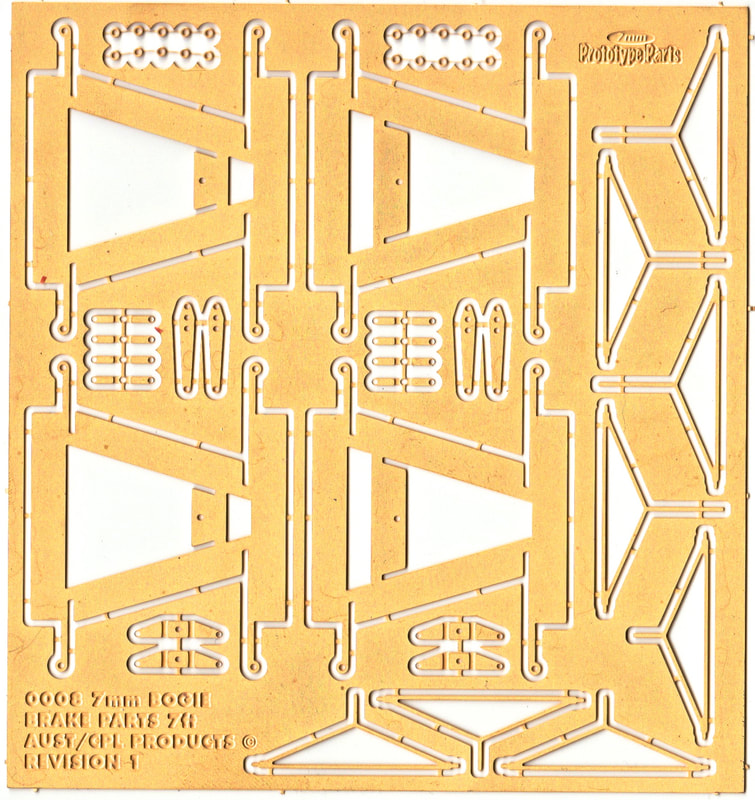
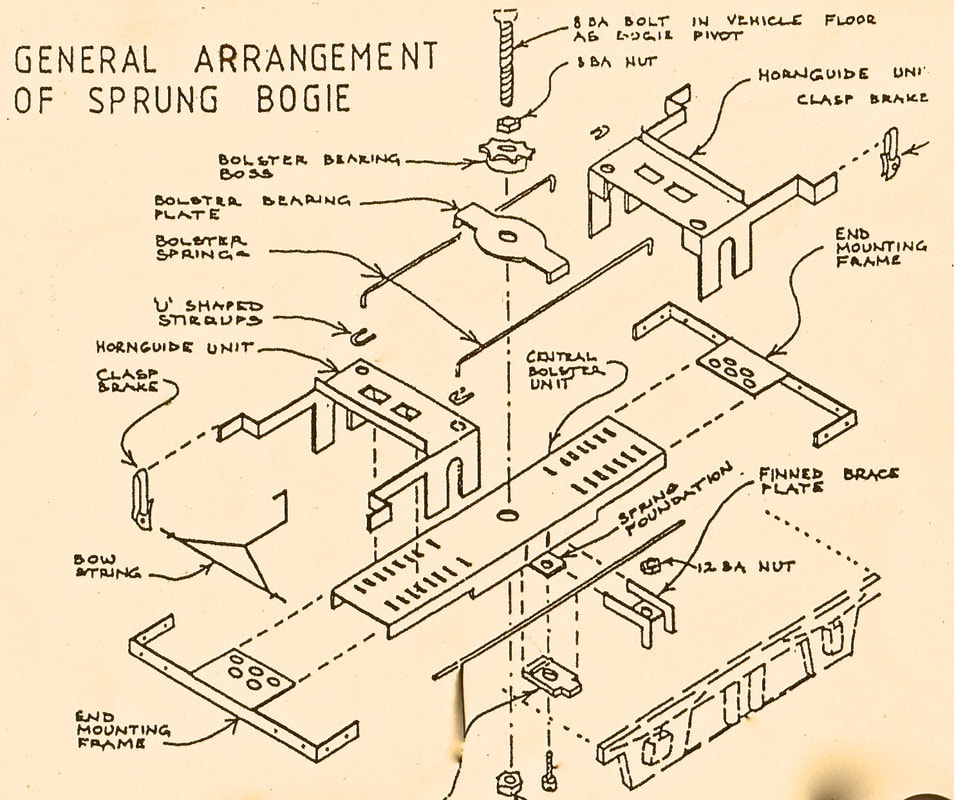
Here's an exploded view of the sprung frame and while it looks quite complicated, it's actually not that bad to put together. We'll try to keep a good stock level of these because they do ride so much better than the solid versions.
|
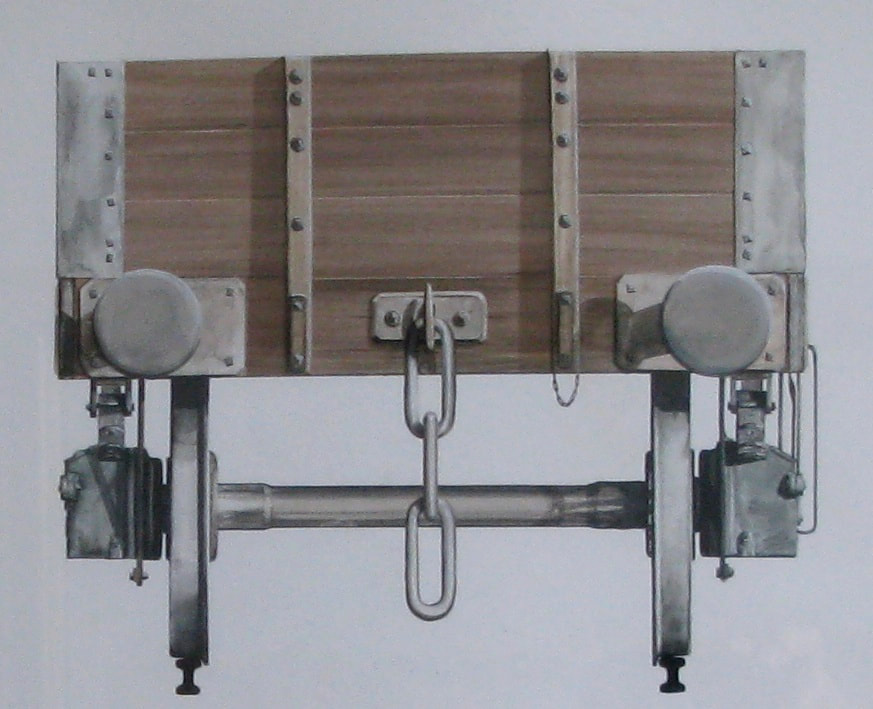
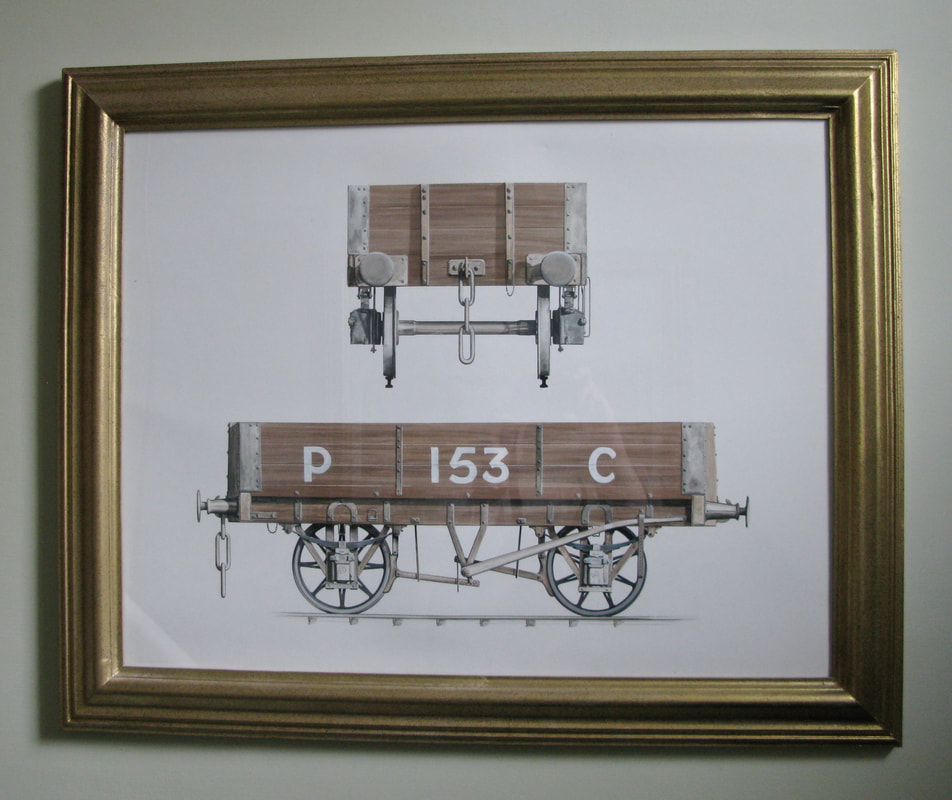
A Wooden Framed Colliery Wagon
This painting was done by Paul quite some time ago and it's a measured pair of side and end elevations of an early to mid Victorian 3 plank colliery wagon, that was preserved just outside the Ellesmere Port boat museum.
|
This was done in Gouache on CS10 board, measured and hand drawn directly from the original wagon which was at the time on a short stretch of rusty track at the Ellesmere Port Boat Museum. We think this might be an old South Wales wagon as the 'C' might stand for colliery, but equally it might stand for corporation, so any knowledgable readers might be able to shed some light on this for us.
The lettering itself was extremely badly faded and barely visible clinging to the wooden planking of the wagon, but each letter was traced and produced exactly as it was. We are looking to put another painting up, so if anyone would like to see it on the wall of a workshop or den it's up for sale for roughly £1000. We are happy to let it find a new home now. It could do with a better frame, but the picture itself is as good as new. |
|
Come and see us at the Bristol 'O' Gauge Group's 2020 show which is held on Sunday 26th January at The University of the West of England, Filton, Bristol between 10.00 and 16.00hrs
|
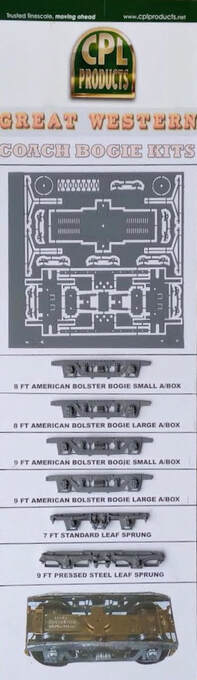
We will be bringing examples of G.W.R. bogie components with options of sprung or rigid construction. The current six types are very finely done in whitemetal and we'll do an illustrated page showing the detail as soon as possible

|
|
Happy New Year everyone, hope you all survived the Christmas / New Year festivities and are now rearing to go again.
I'll put in a few news items here and try to update again in a few weeks. I have also included a secondhand page in the menu with a variety of different items, please do take a look.
I'll put in a few news items here and try to update again in a few weeks. I have also included a secondhand page in the menu with a variety of different items, please do take a look.
|
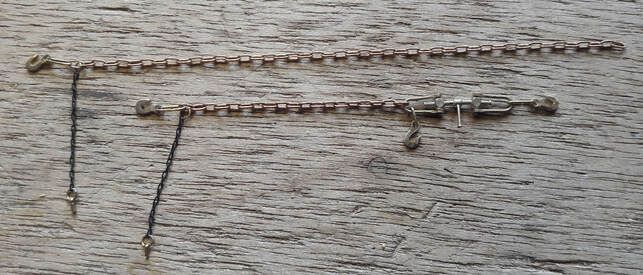
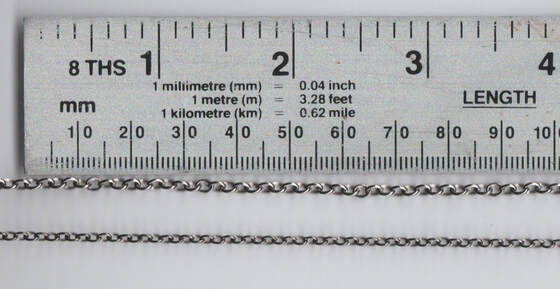
We have three weights of load chain in stock at the moment, and here are the two larger ones against a scale for reference. If you would like a shackle kit with either one of these variants, just let us know.
|
|
Aberayon and Chilton Layout
On behalf of Kevin Wilson, we'd like to remind folks that the 7mm Aberayon and Chilton layout is still available and and it can either be permanently installed or re-instated as a portable exhibit. The layout has appeared in Model Rail magazine.
The small coastal terminus station has two platforms, with a typical yard of goods sidings sited opposite for local coal deliveries. To the nearside, a narrow gauge feeder line climbs from a gravel quarry up a steep gradient to arrive at an elevated platform alongside a siding with chutes to direct tipper wagon loads into waiting main line wagons shunted into the siding below.
Alongside the station throat pointwork, a small single road locomotive shed is sited for servicing, and another small fan of sidings out in the opposite direction to provide van access to the red brick goods shed. A G.W.R. signal box is placed opposite this and it is quite easy to shunt both yards prototypically, separating and sorting the wagons in between the passenger timings.
For further details, please click the link provided and call Michelle either on 01296749070 or 07704917623 and click on the link below for further info and photos. We are really only looking for a new home for this, there's a considerable amount of equipment and well detailed modelling on the layout as well.
The picture is courtesy of Chris Nevard / Model Rail Magazine
Please note the stock is not included.
http://bambrickstudio.co.uk/aberayon/
Westcott Layout
We also need to find a home for the Westcott layout and this 7mm scale terminus model has had all the trackwork renewed lately including the tramlines. It has a full townscape backscene and a good deal of scenic reworking has also been done of late including the addition of trees. The layout was featured in Model Rail magazine No 232, as well as a gallery feature on ‘Let’s go Loco’
As with Aberayon the layout is complete but comes without stock, so please do get in touch if this is of interest and you would like a readymade 7mm layout.
Picture courtesy of Chris Nevard / Model Rail Magazine. For further details, call Michelle or Paul on 01296 749070 / 07704917623 and click on the link below for more info / photos.
http://bambrickstudio.co.uk/westcott/
I am going to be doing updates here from now on, as Paul is snowed under with backscene and diorama work. I have also now started to sell couplings and other CPL products on Ebay, which is proving to be quite successful. I have provided a link directly to these particular items below, and if you do prefer to use this method, please feel free to do so.
https://www.ebay.co.uk/itm/184042966072?ssPageName=STRK:MESELX:IT&_trksid=p3984.m1555.l2648
https://www.ebay.co.uk/itm/184042966072?ssPageName=STRK:MESELX:IT&_trksid=p3984.m1555.l2648
Cab Gauge Faces
We'd really like to thank the Gauge O Guild for mentioning our recently re-released Cab Gauge Face sets in 7mm scale in their Trade Liaison magazine, but for those locomotive modellers that may not have seen these yet, we'll just list the five different variants here.

|
These sets have been successfully reproduced now,using traditional darkroom methods, directly exposed from contact negatives to avoid any unrealistic ‘pixellation’ issues. The variations include GWR, Southern & LSWR, LNER and LMS as well as BR Standard. They are done on white photographic paper and they can be cut very slightly oversize, then carefully rounded by holding with tweezers and gently rubbing the edges round with wet and dry 220 grit paper., a single bead of gel superglue secures the cab gauges in place.
|
|
|
The Reading Trade Show was a great success and Pat Legg helped us out as I couldn't make this particular event. We are certainly attending the Bristol O Gauge 2020 show in January, so by all means pop along for a chat, the details are below. More information can be found using the link provided.
It takes place on Sunday the 26th January 2020 at the University of the West of England (UWE). The doors open at 10am and close at 4pm. Free parking is provided. There's a good map supplied on the BOGG link, together with considerably more informations if you haven't attended before. It's a very nice venue, quiet and carpeted for comfort. Looking forward to seeing you there. http://www.bogg7mmexhibition.com/ We'll have the usual stock with us, but I am currently sourcing a few different types of load chain to accompany the shackle kits. In protoype practice a much lighter chain would have been commonly seen securing containers and smaller more modern road vehicles etc, whereas the heavier duty oval link chain would be necessary for larger industrial loads such as military tanks, large castings, traction engines and so on. |
|
Updated 7mm Etch Stocklist
Paco N16 horsebox just etch or kit without brake cyl. Please inquire.
C21 (49319) Corridor Clerestory sides and ends £90 + p&p
E19 (54729) Brake Non Corridor composite perfect condition etch £65 + p&p
Hounds van 6 wheel (Ex Catalogue) £90 + p&p......SOLD
F1 (43327) Clerestory Slip Coach £90 + p&p....... SOLD
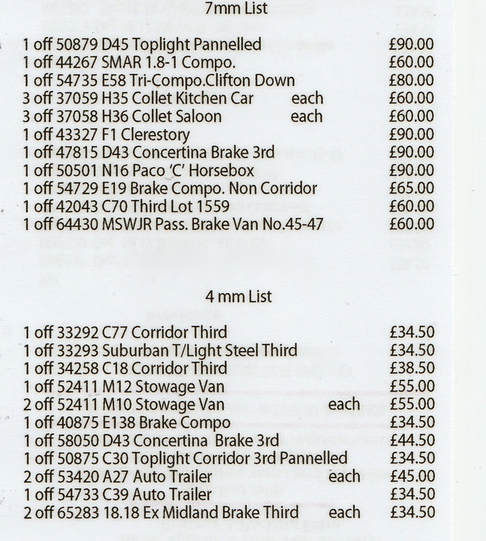
H35 (37059) Bow End Collett Kitchen Car £60 + p&p
1 x GWR 517 loco shell (includes Transfers and real glass for the windows). £65.00 + p&p.......SOLD
D45 (50879) Toplight 57' panelled brake 3rd £90 + p&p
H36 (37058) End Collett Composite Diner £60 + p&p
D121 (42045) brake 3rd £60 + p&p
C21 (49319) Corridor Clerestory sides and ends £90 + p&p
E19 (54729) Brake Non Corridor composite perfect condition etch £65 + p&p
Hounds van 6 wheel (Ex Catalogue) £90 + p&p......SOLD
F1 (43327) Clerestory Slip Coach £90 + p&p....... SOLD
H35 (37059) Bow End Collett Kitchen Car £60 + p&p
1 x GWR 517 loco shell (includes Transfers and real glass for the windows). £65.00 + p&p.......SOLD
D45 (50879) Toplight 57' panelled brake 3rd £90 + p&p
H36 (37058) End Collett Composite Diner £60 + p&p
D121 (42045) brake 3rd £60 + p&p
Updated 4mm Etch Stocklist
A27 (53420) Auto Trailer £45 +p&p
D45 (50876) - GWR Toplight Panelled Brake Third 57' £34.50 + p&p
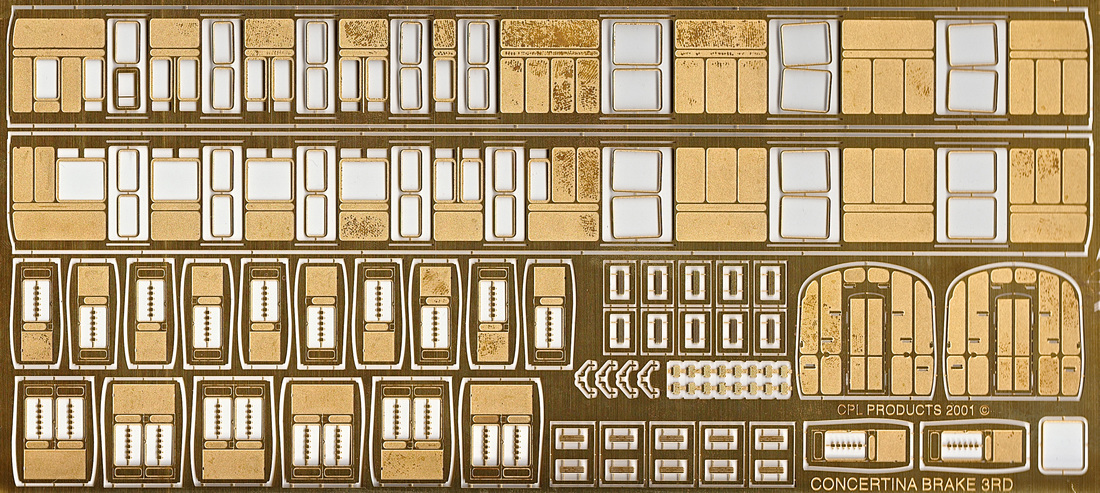
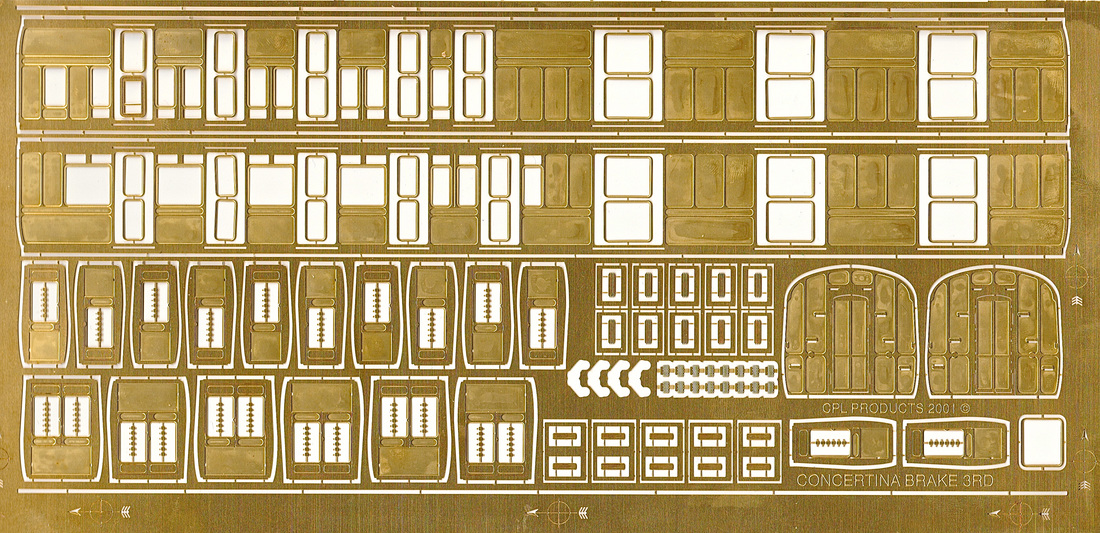
D43 (58050) Concertina Brake Third £44.50 + p&P
Single Unit A.E.C Diesel Railcar £45.00 + p&p
M10 (52411) Panelled Stowage / Brake £55 + p&p
E103 (33294) Toplight Steel Composite £34.50 +p&p
J12 (54733) Sleeper £34.50 +p&p
C24 (42046) Dreadnought Corridor Third £44.50 + p&p
D42 (48585) Brake Third £44.50 + p&p
E138 (40875) Panelled Brake Composite £34.50 + p&p
M10 (52411) Stowage Van £55 + p&p
D45 (50876) - GWR Toplight Panelled Brake Third 57' £34.50 + p&p
D43 (58050) Concertina Brake Third £44.50 + p&P
Single Unit A.E.C Diesel Railcar £45.00 + p&p
M10 (52411) Panelled Stowage / Brake £55 + p&p
E103 (33294) Toplight Steel Composite £34.50 +p&p
J12 (54733) Sleeper £34.50 +p&p
C24 (42046) Dreadnought Corridor Third £44.50 + p&p
D42 (48585) Brake Third £44.50 + p&p
E138 (40875) Panelled Brake Composite £34.50 + p&p
M10 (52411) Stowage Van £55 + p&p
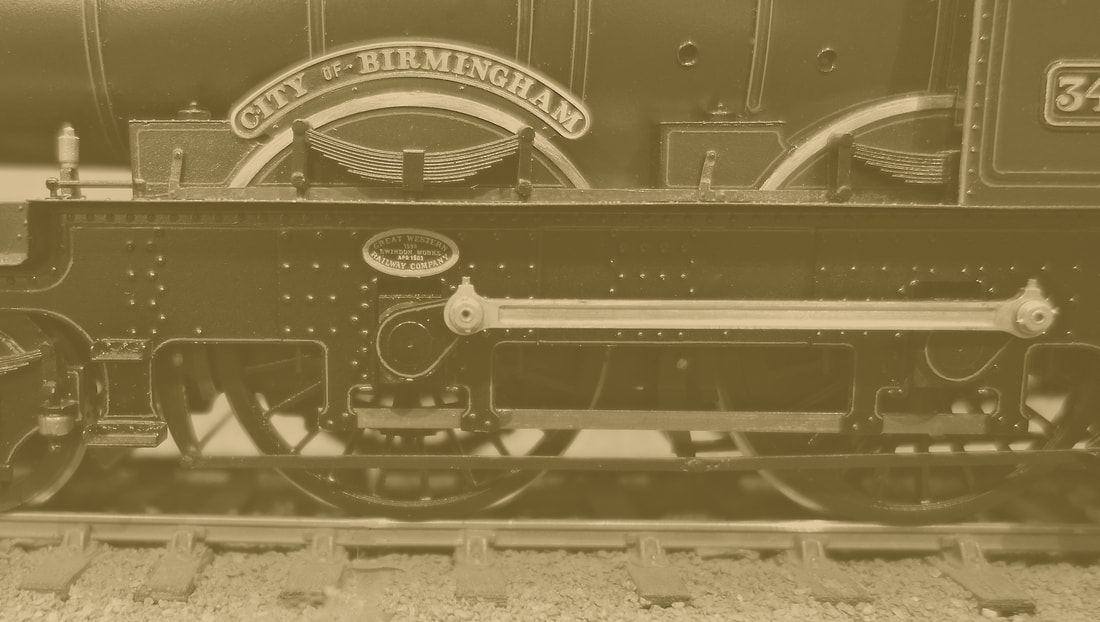
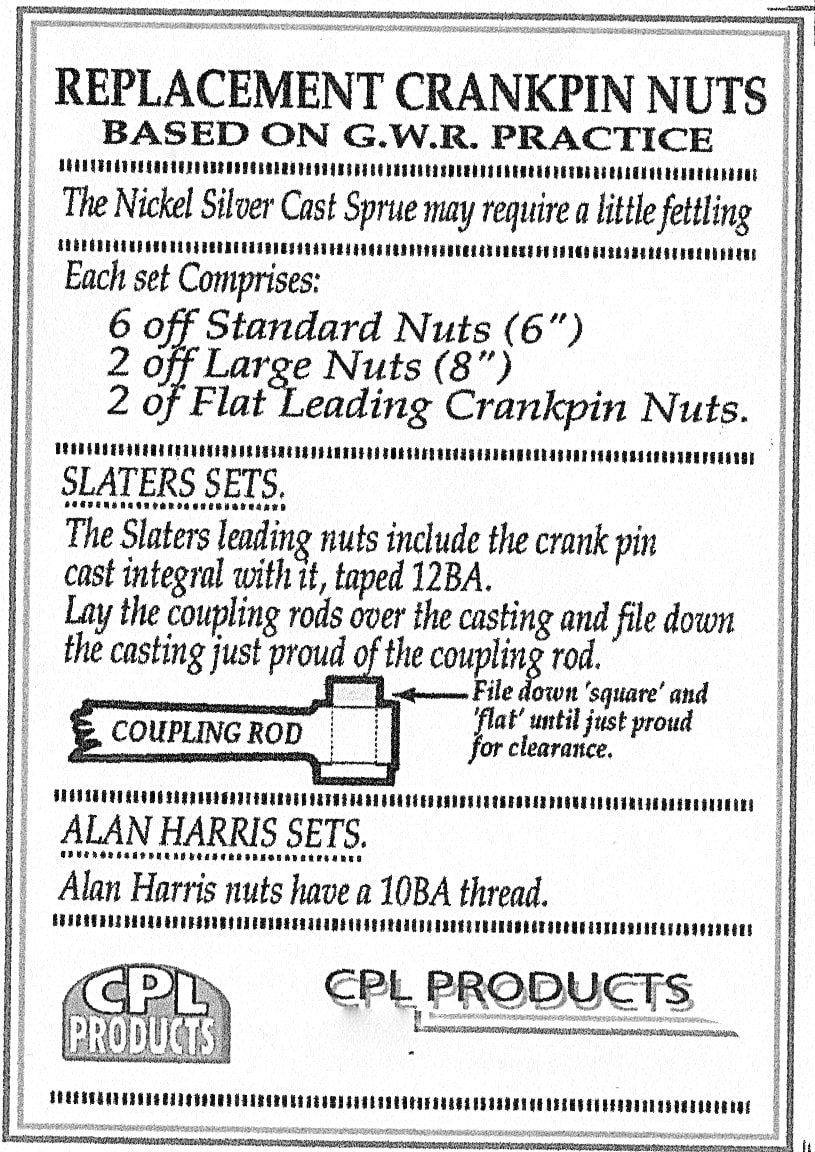
Nickel Silver Crankpin Nuts for 7mm Locomotives
|
These cast crankpin nuts are now directly available on our new Ebay link. If you are not familiar with these, they have been designed to replace the conventional hex 12BA fasteners supplied with Slaters type coupled wheelsets. This particular profile was originally designed for Swindon engines, but they do a good job of replicating the typical coupling rod retaining collar nuts on many other locomotives from the turn of the last century to the end of steam.
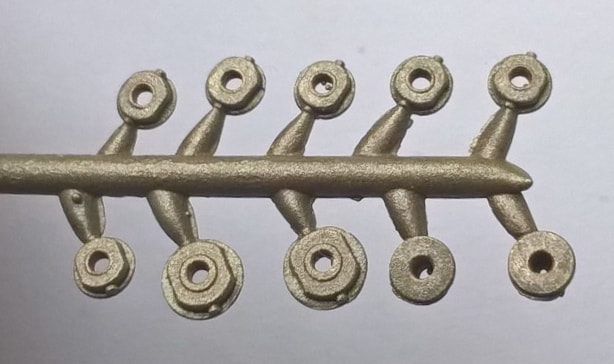
The facing surfaces can be finely turned if required, and the sprue includes: 6 off standard nuts (6') 2 off large nuts (8") 2 off flat leading crankpin nuts Instruction and installation recommendations are included. |
|
If you would like to go straight to the Crankpin Nuts on Ebay just click on the link below.
www.ebay.co.uk/itm/184065159076 |
The Nickel Silver sprue can be seen to the right and the instructions to the left. For different wheel arrangements and inside cylinder engines like the one pictured above, simply examine the sprue to see how many nuts will be required.
We also have 10BA male crank pin nut sets for use with the Alan Harris type wheelsets. |
|
A few builders have submitted photographs and descriptions of their recent work, so we can take a look at a few of those. If you have any of your own work that you would like to us to publish here, just contact us at [email protected] or [email protected]

|
Robert Pickford very kindly sent in a photo of his 7mm scale CPL Concertina. There is still some work to be done on the lining and transfers but it looks terrific. The roof is made from car body steel as he wanted some rigidity for its length. He is also going to try and make a 20 inch capacity roll bar for the future as this particular roof was rolled by hand.
Robert also volunteers at Didcot and thought that it would be good to make up a model of their Dreadnought Third so people can see what the coach will eventually be like once it's done. He has asked us to supply a set of etches including underframe and interior for one of his next projects which will be a Concertina Brake 3rd. Robert has also copied some this information to a few of the talented volunteers who run the carriage and wagon side at Didcot to gauge their thoughts and we are very happy to be involved with this. I am sure that Carl would have approved. |

|
Colin Jenkins sent in a couple of photos of his completed G58 Saloon from JLTRT. It is fitted with CPL door handles, commode handles, vacuum tells and transfers and as Colin says, by and large it has turned out really well.
|
|
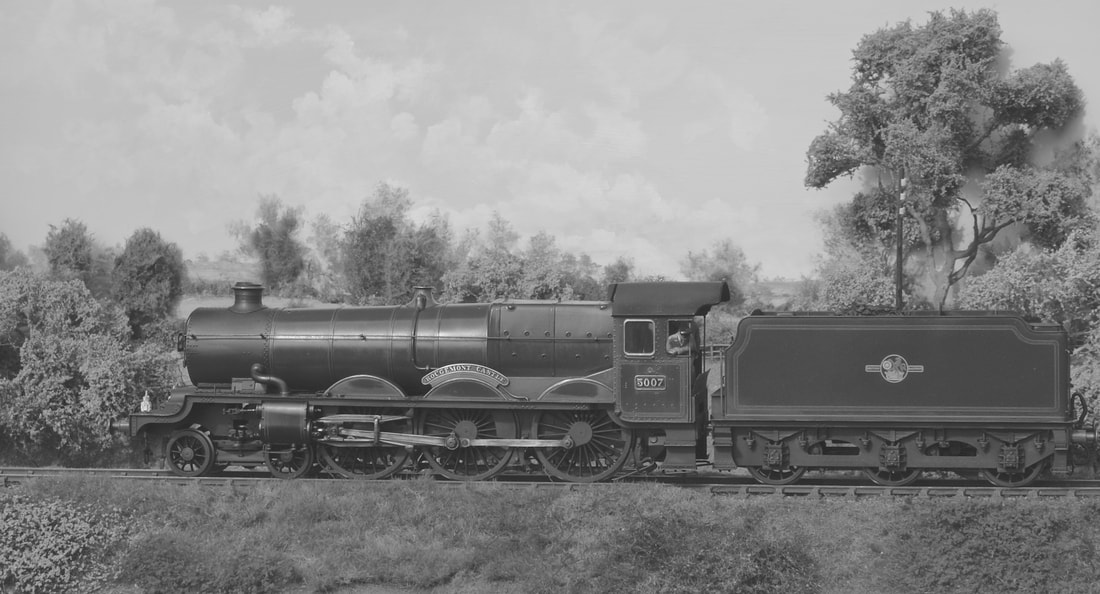
Quite a busy September, with a small extra table alongside our normal 6ft product stand at Telford. This allowed us to put a few lineside accessories out, like loading gauge, kissing gate & estate fencing etch frets, as well as a few book copies and a diorama with Phil Gomm's excellent G.W.R. No 5007 'Rougemont Castle' on display. A good many vehicle etches have also gone out as well this month, and I am now well on the way with cataloging the range of castings.
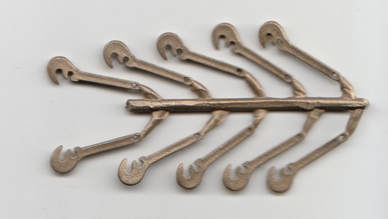
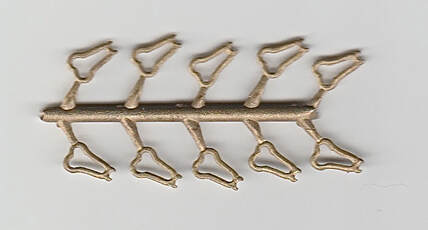
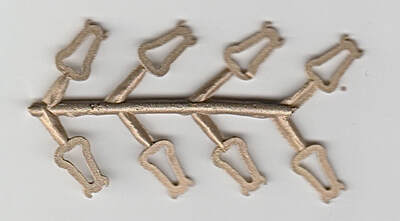
Cast coupling hooks are listed separately as a sprue of 10 (to left), but I think it might be an idea to do the same with the instanter links of G.W.R. (to centre) & B.R. (to right). This allows an easy upgrade of existing plain 3-links by simply replacing the centre link with the appropriate type. I can keep the cost at the standard £10.25 plus P&P. Let me know if you like the idea, as it's much easier than changing every coupling.
|
|
|
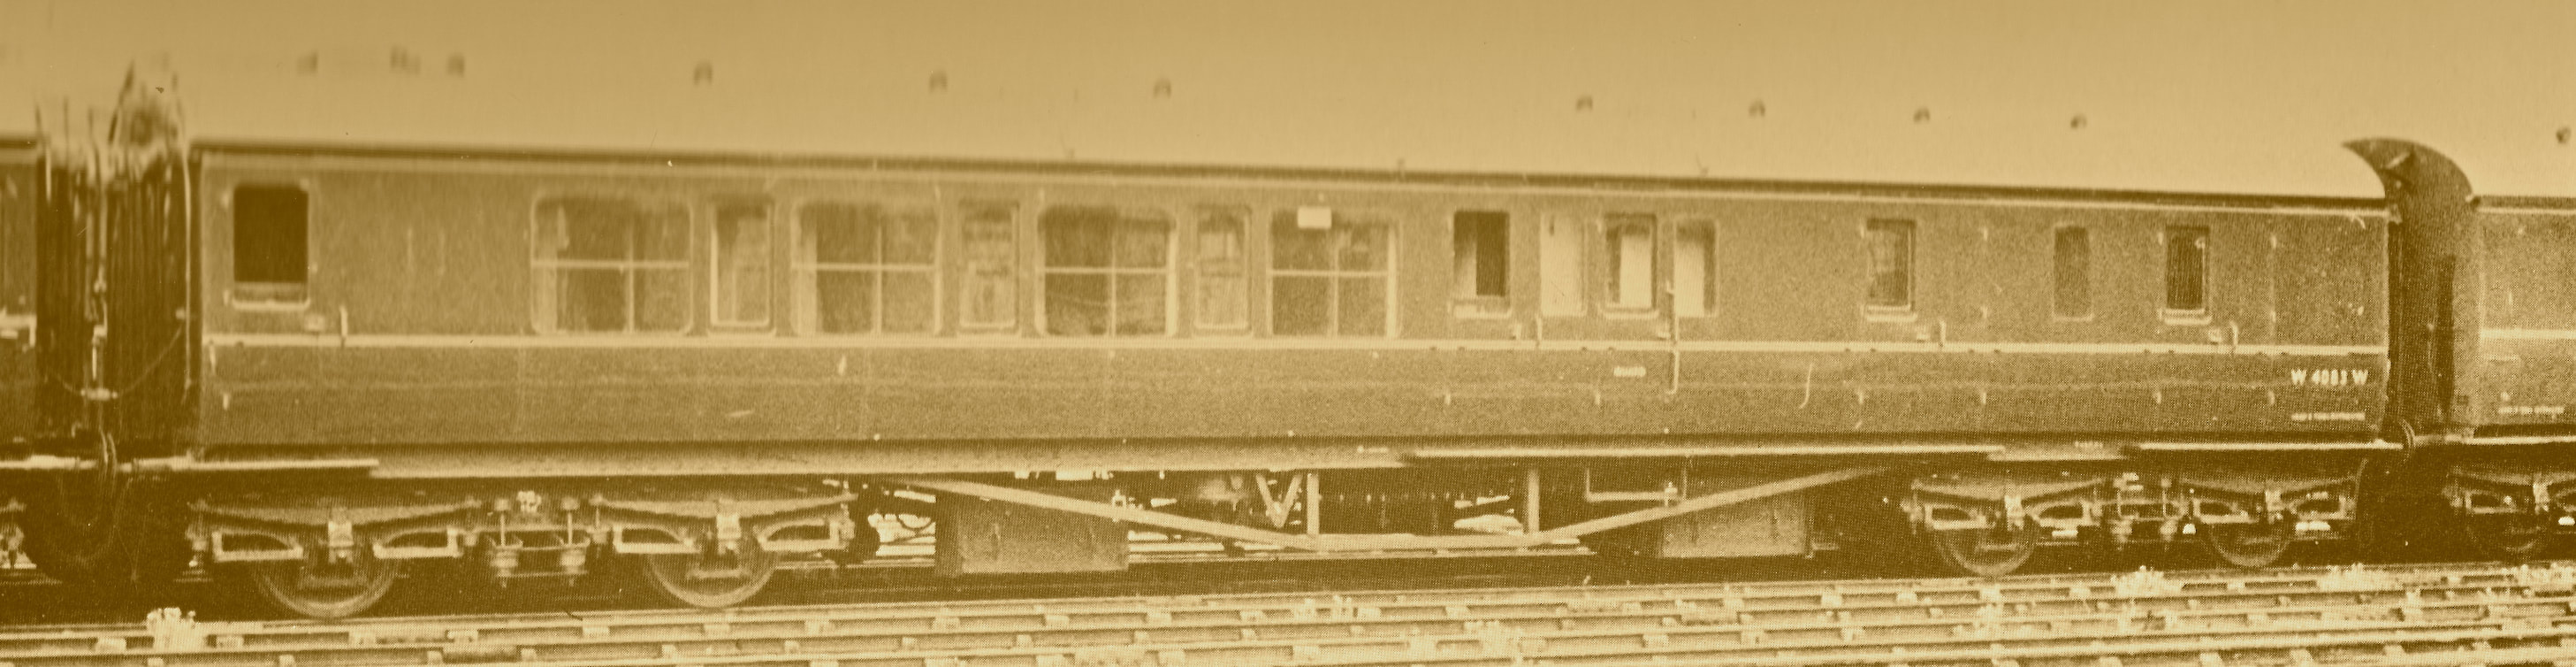
Diagram D45 Toplight Corridor Brake 3rd coach
|
Both 4 & 7 mm etches are in stock for this vehicle, but the 7mm version has the option of a separate underframe and a comprehensive list of castings and equipment to correctly detail the model. This has the standard width passenger scissors type corridor connections, and all the panelled interior partitions including the brake end doors are included in both scales.
|
|
GWR locomotive screw coupling
|
I will have stock of Great Western locomotive screw coupling castings within a few weeks, after being completely wiped out at Guildex! This one is coupling a pair of Stuart Dodd's 4-6-0s
|
Diagram F1 Clerestory Double ended Slip coach
|
This 7mm scale 15thou etch comes with sides, ends, partial underframes & bufferbeams, droplights, vents, steps, lamp irons, and bolection mouldings. Square shank, oval head buffers along with couplings and other detail parts are available if required.
|
|
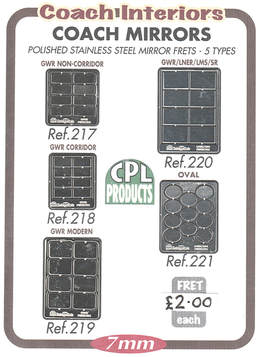
The compartment interior mirrors are now remanufactured from 12 thou medical stainless steel, and there are a few more variations and sizes than the display pictured opposite. There are some smaller ovals and sharp cornered large 1930s mirrors as well.
|
Along with some of these previously listed etches, there are a number of Midland 6 wheeled carriages that could probably be done with the ex-Slaters underframes. I'll try and get round to finding some reference example pics and etch scans for these.
|
Diagram F16 Double ended Toplight Corridor Slip coach
The picture alongside was taken at Swindon's carriage sidings by Roye England, and the 7mm etch below contains the flat components for the body. A number of other components are available to progress this one, including a separate 57 foot T/L underframe, Square shank round buffers, couplings, jump cables, steam & brake pipes, Commode, door & grab handles, brake cranks, along with the usual battery box, transfers and interior detailing parts. It just needs bogies, a roof, and some dedication! Here's a copy link to a well made movie clip that clearly shows a slip working at Banbury https://www.youtube.com/watch?v=7NEwrjQtrKo |
|
|
|
|
Sorry for huge time delay in posting here, Some more information has been added to the temporary catalogue page, and two outings for later on this year can also be mentioned as confirmed attendances at the Reading O gauge trade show at Rivermead, and the Guildex weekend event at Telford's International centre.
Orient Express Interior
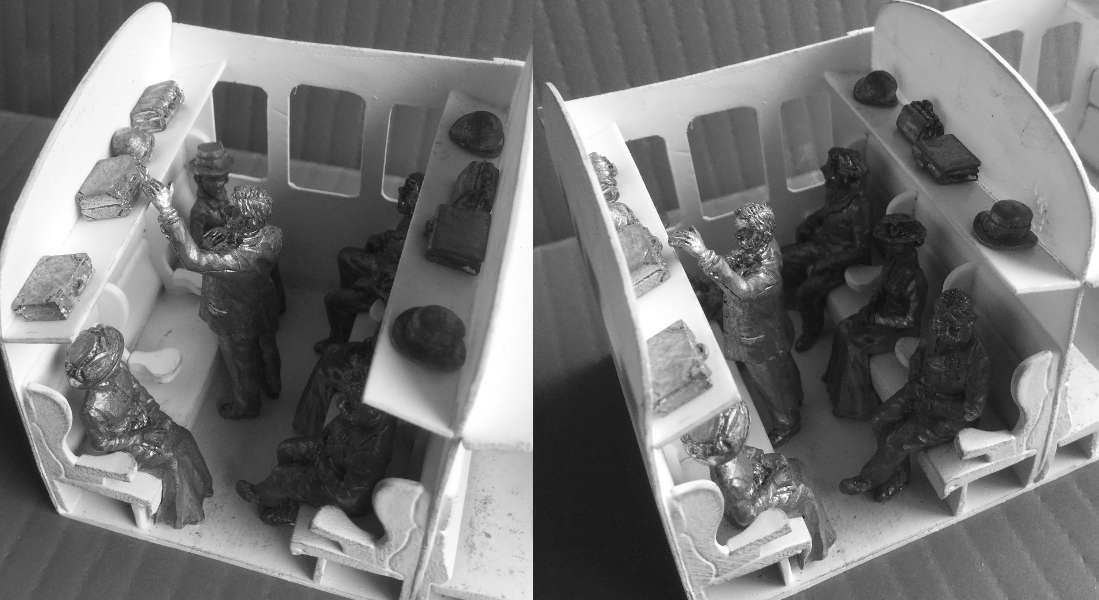
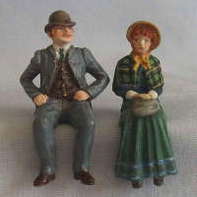
Nobuyuki Kikuta from Haraichi (just north of Tokyo) has obtained a few CPL late victorian figures for his scratchbuilt 7mm scale Orient Express model.

|

|
|
|
4mm G.W.R. 9ft Fishbelly bogies
These are now in stock, available in pairs, just requiring wheelsets and axleguard castings.
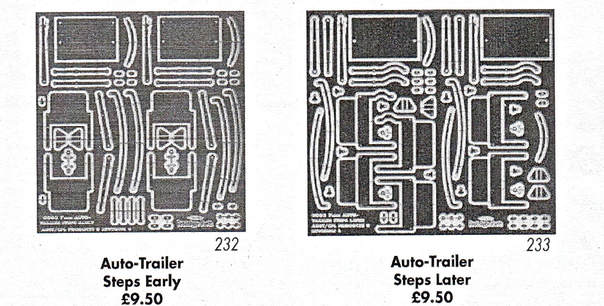
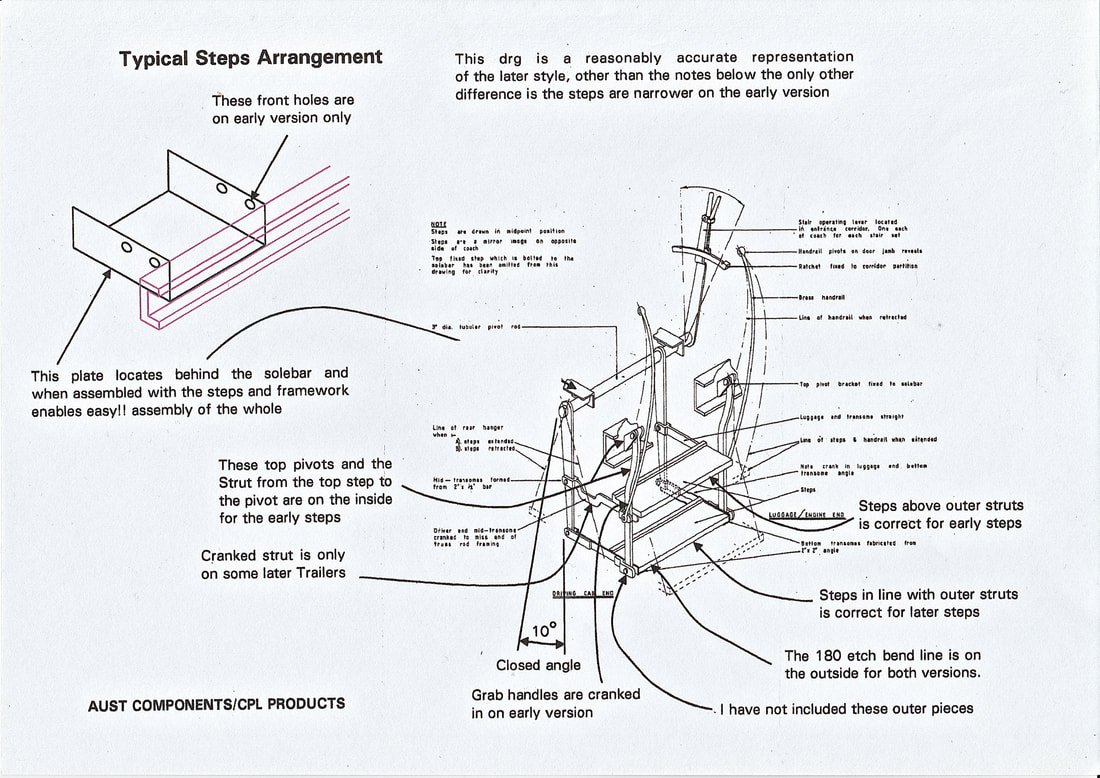
Auto trailer steps
I have included the same large size assembly diagram in the new instruction leaflet page. Both types of step are in stock.
|
|
New G.W.R. carriage destination board

Taken from original monotone reference and reproduced to 7mm scale, it can be altered to 4mm scale for a small admin charge. (A/W reduction & print)
|
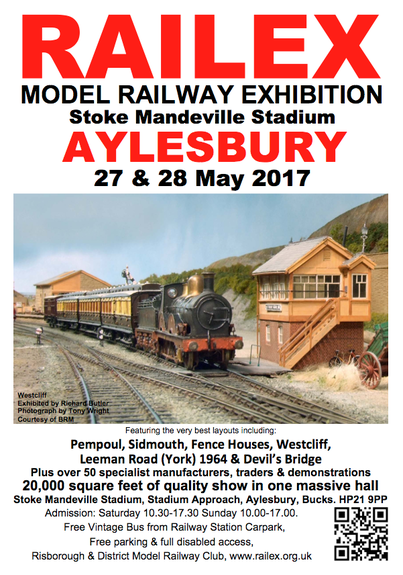
The Bristol show went very well, so thanks to all the customers who came along, and also to those who took an interest in my 'Creating a Backscene' scenic landscape book. We will be at the Railex 2017 Multi-scale show at the Stoke Mandeville stadium in May, alongside Hudson books in case you would like to come and see us. It's consistently one of the best shows on the calendar so here's the link to find out more:
http://www.railex.org.uk/ 
It's the last outing for Gordon and Maggie Gravett's Reseau Breton based 'Pempoul'
|
|
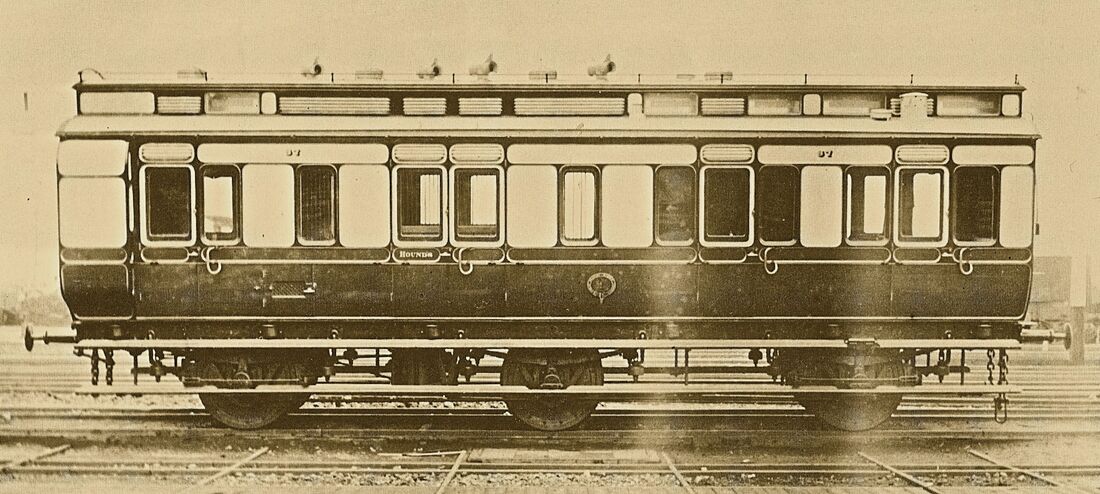
G.W.R Dia W8 Hounds Van in 7mm
This isn't listed in the Catalogue yet, but it's the same standard price of £90, including the underframe, 'W' irons and footboards
|
This 7mm G.W.R Diagram W8 34ft clerestoried hounds van, is a six wheeled version of the smaller bodied 21ft four wheeled W5 of the early 1880s. It appears to be numbered 97, and has brakes on the outer wheelsets only (you will need a separate etch for this equipment) but the usual solebars, bufferbeams and half etch overlays as well as steps, panelled ducket, lamp irons, droplights and bolection mouldings are present. I have the transfers, interiors, cast brass handles, couplings and buffers, but you will need to find Trumpet ventilators for the dog compartment, brake cylinder, axleguards and early broad gauge type safety chains.
I don't actually have any dogs to go with it, to be honest, but either way it would look good in a branch line train with some other clerestories, horseboxes and of course, a double framed locomotive. |
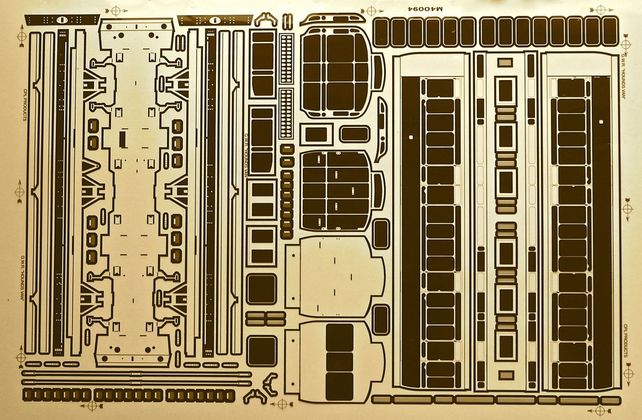
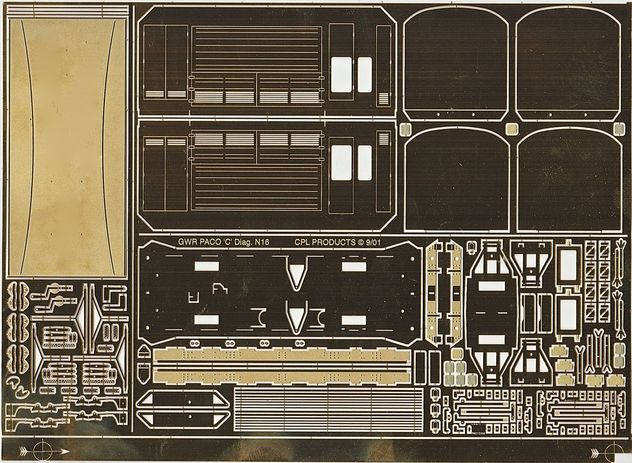
G.W.R. Dia N16 Horse Box
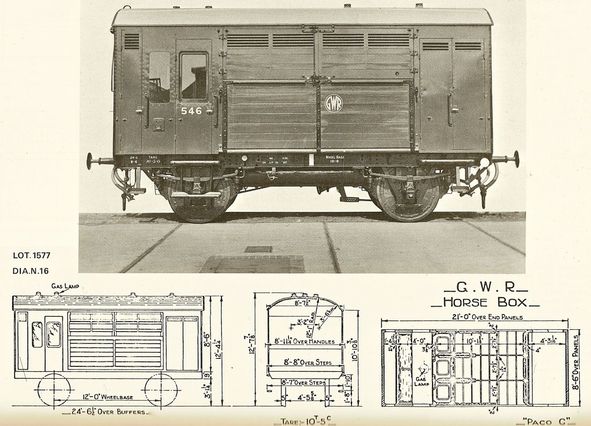
The 30s shirtbutton logo in yellow and the brown vehicle numbers are in stock.
|
|
I now have etches in 4, and & 7mm for this 1937 Paco 'C' Diagram N16 Horsebox, and I have assembled a kit for the 7mm version. The etch is really comprehensive with compensated W irons and fully detailed brakes. The only items missing are the roof vents and lights, and the underframe tanks & cylinders. The etch in (pictured) 4mm is listed at £39.80, and the 7mm kit is complete with a separate detail ironwork strapping etch, both steam & vac pipes, screw couplings, sprung buffers and handrail for £94.00.
The first thing is to apologise to the customers who have used the contact form to place orders over the last month. It is likely that you will have recieved no reply because of what appears to be a problem at this end. Please do re-contact me with your requests at; [email protected] and I will deal with them ASAP.
Alternatively, I will be attending the Bristol 'O' gauge event in a week or two, and will have all the stock as well as some 7mm stock carriage etches. Illustrated below are an H36 Collett Bow end composite to the left, and a 57' D45 T/L Corridor Brake to the right. The corridor connections and full interior kits are available for this one, along with the usual buffers and couplings etc.

|

|
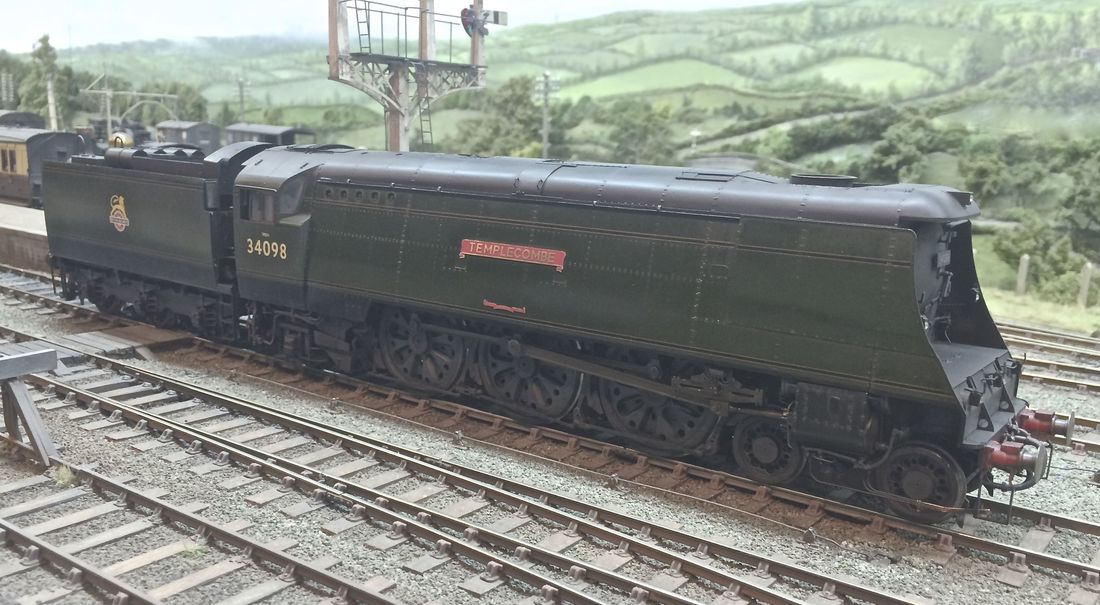
This is a Finney 7 Bullied West Country Pacific, and it has the CPL 29 Southern Railway 3 link screw couplings which come as standard, supplied with the kit.

I have a body kit etch for this A.E.C. diesel railcar in 4mm, including the roof, but I have sold the stock, so leave a few weeks if you would like one & I can do another run.
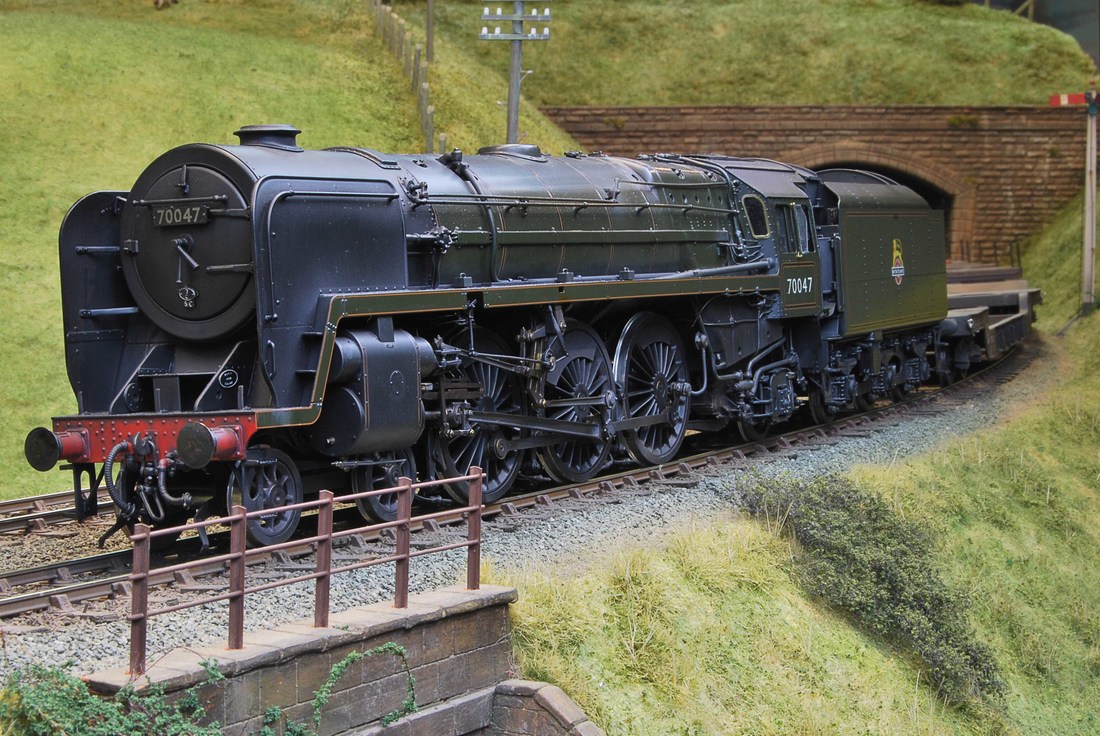
The B.R. Standard 3-link couplings are in stock, and here's a set on a weathered Masterpiece Models Brittania pacific.
Some 4mm stock etches have come to light in the bottom of a storage box, so I will put a few scans of them here.
|
50850 G.W.R. D43 Concertina Brake 3rd... £35.00
|
|

|
54733 G.W.R. Dia C39 Auto Trailer with steps... £35.00
|
|
53420 Auto trailer with steps...£35.00
|
|
|
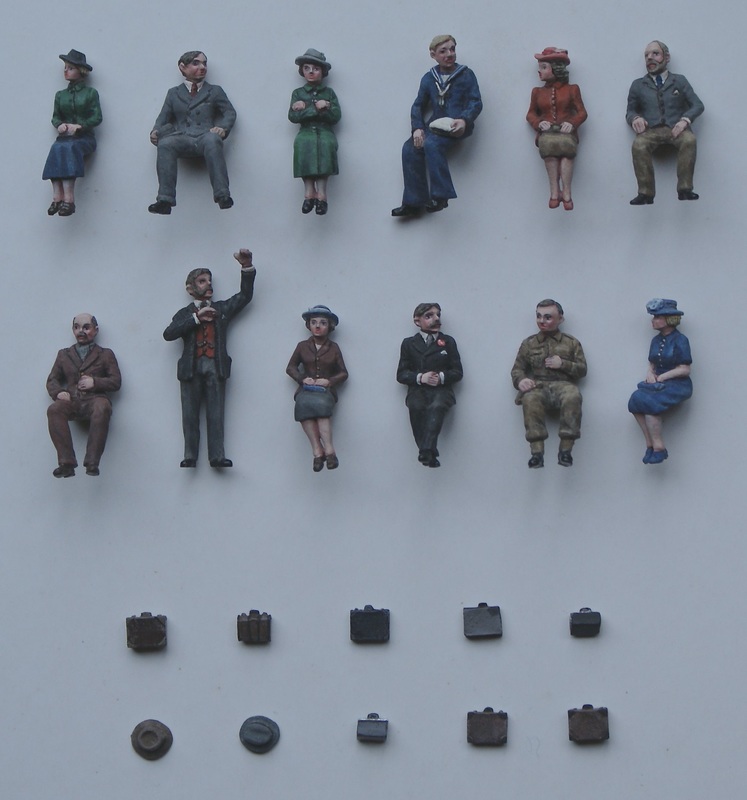
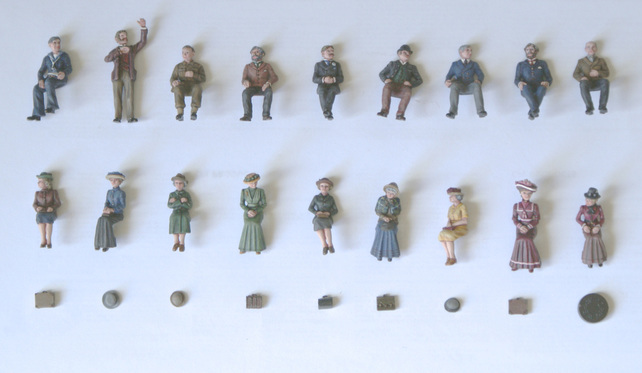
The new 1940s figures are now available, and alongside is a picture of the 12 characters with their hats and other belongings.
|
|
|
GWR Couplings
I now have good stock of the GWR locomotive couplings, and these will eventually be included in the re-introduced Rover class locomotive kits from 'Finney 7' . |
Hurley Group Annual Exhibition
I will be attending the Binfield 7mm exhibition with CPL. There are seven layouts including the first outing for Okehampton, as well as a good selection of trade outlets.
I will be attending the Binfield 7mm exhibition with CPL. There are seven layouts including the first outing for Okehampton, as well as a good selection of trade outlets.
|
|
D43 Concertina Brake Coach
For collectors of 4mm scale GWR Concertina stock, I do have a D43 Brake third in stock at the moment (Similar pic included). It's a very detailed, fine etch for a professional build. |
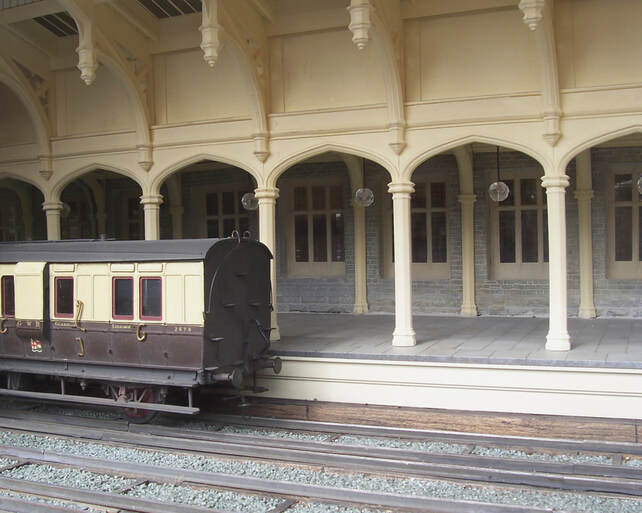
Auto train locomotive body
|
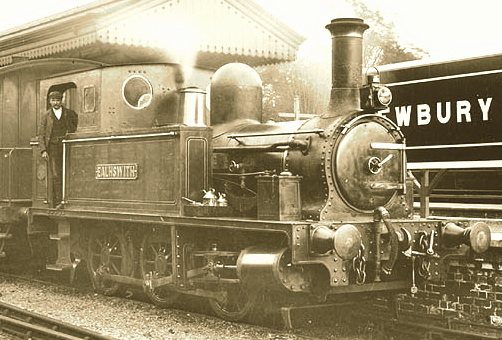
This experimental G.W.R. enclosed locomotive pictured on the right was one of four examples that appeared in 1906. As well as 517 class 0-4-2Ts Nos 533 & 833, a pair of 2021 class 0-6-0Ts Nos 2120 (pictured) & 2140 were partially disguised by this carriage profiled outer casing.
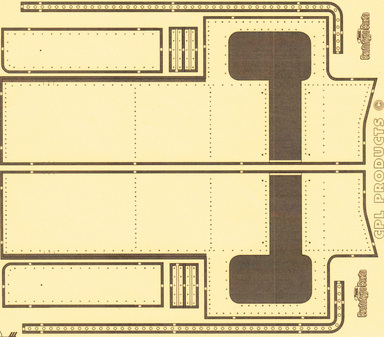
They turned out to be quite impractical, partly due to maintenance access issues and other difficulties like dirt soot and ash accumulation within the shell as well as excessive interior heat buildup making oiling round and other crew responsibilities uncomfortable. If you are after something a bit different for that Edwardian G.W.R. branch line terminus, I do have an etch to reproduce the shell in 7mm scale which has window beadings, footplate brackets and buffer beams but it does need a profiled roof with hatches for the water tank fillers. I have the transfers as well, but do bear in mind they had all been removed by 1911! £65.00 plus P&P includes Transfers and real glass for the windows. |
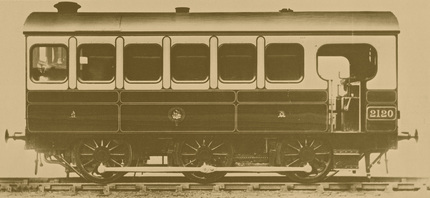
The fully lined outer shell was simply intended to provide a visual uniformity
for the train’s formation, and once the locomotive was coupled between a pair of similarly liveried auto-trailers, it probably helped to disguise the familiar steam outline to an extent. 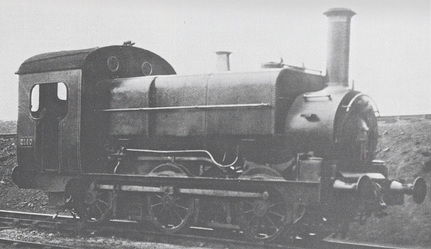
|
4mm AEC Railcar single unit.
I will be adding this to the 4mm scale etches list, and when all the other 4mm stuff is all photographed, I will separate the Etches page into different scales.
|
|

|
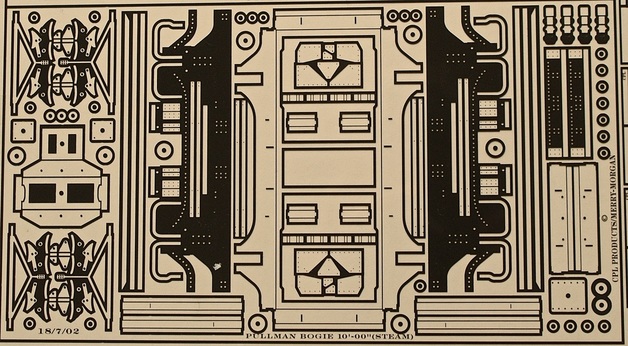
Pullman 10ft bogie
Many steam hauled Pullman Coaches were equipped with the unequalised rivetted plate 10 ft wheelbase bogies, so if you are struggling to find them in 7mm, let me know. The fold up etch contains the bogie frame with crossmembers, bolster and brake gear as well as separate overlays for the curved lower channel. Even the axleboxes and individual spring leaves are included, so certainly not a beginner’s etch, but quite an impressive level of authenticity is achievable with enough time spent. |
Getting the trade stand displays sorted out for the looming Telford show. Here are a few pictures, with some reference to new and existing product lines, by all means stop by at the show stand, or inquire about details beforehand using the contact form.
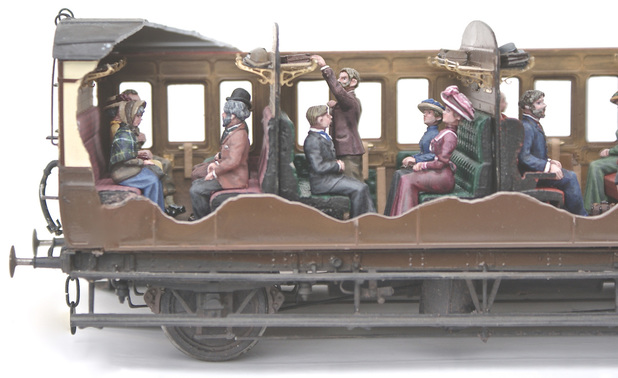
Passengers
This is a range of figures with six brand new characters, and I have made a quick mockup of some different compartments to show them in situ, using interior parts from CPL stock. The one in the middle of the left picture uses the new 3D printed buttoned seats, done in green leather finish, while the others use printed material covers. I particularly like the gentleman reaching up to the luggage rack.
|
|
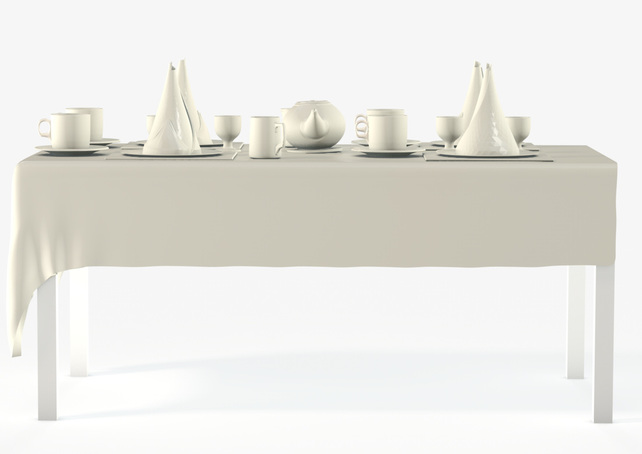
Dining Tables
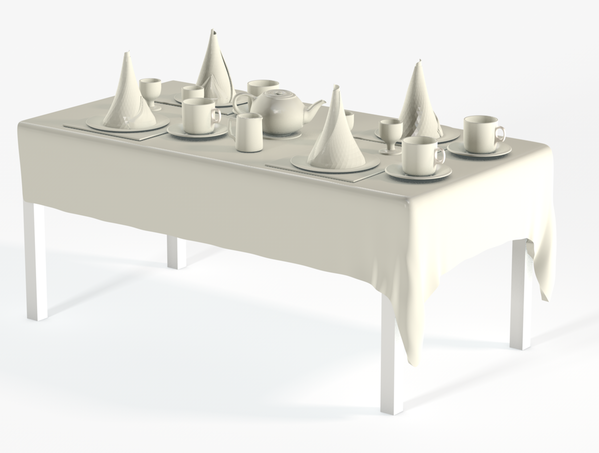
A 3D file render of a G.W.R. dining table set. It has been reproduced from photographic records and can be tried out soon with a few additions like cutlery and additional metal items to finish it off.
|
|
Etches
A nearly completed list of etch plates has been done, so they can soon go into a new page. A scan of each side is included along with the vehicle description, so you can check it more easily against your reference. When I can, I'll add some thumbnail prototype pics and other info, like build dates, running gear and other equipment.
|
|
|
Locomotive Plates

|
|
I will bring all the stock of cab and splasher plates along. They are a job to display due to their small sizes, so if you don't see your one out, just inquire and I'll have a look.
Both the examples have CPL plates, and the Adams Radial also has the separate L.S.W.R. Brass cabside numbers.
Both the examples have CPL plates, and the Adams Radial also has the separate L.S.W.R. Brass cabside numbers.
Name & Number plates
After Guildex I will come up with a list of all the plates and films, they do need cutting out and filing round, but some of them have a great patina that you don't get with new ones.
as long as you dull down the cut edges, they come already weathered!
as long as you dull down the cut edges, they come already weathered!
Corridor Connections
As well as G.W.R. Corridor connections, there is a very small stock of G.P.O.(double scissors) and L.N.W.R. Wolverton examples. I can always get batches done if you are making or re-equipping an existing rake, but there is some inevitable lead time while the films are away
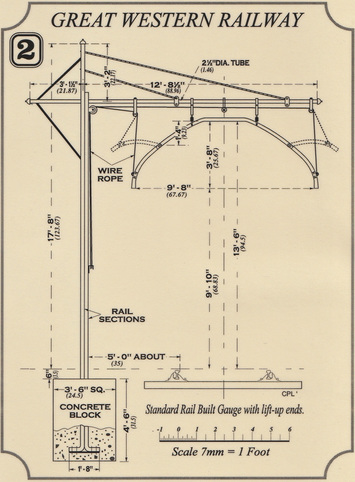
Loading Gauge
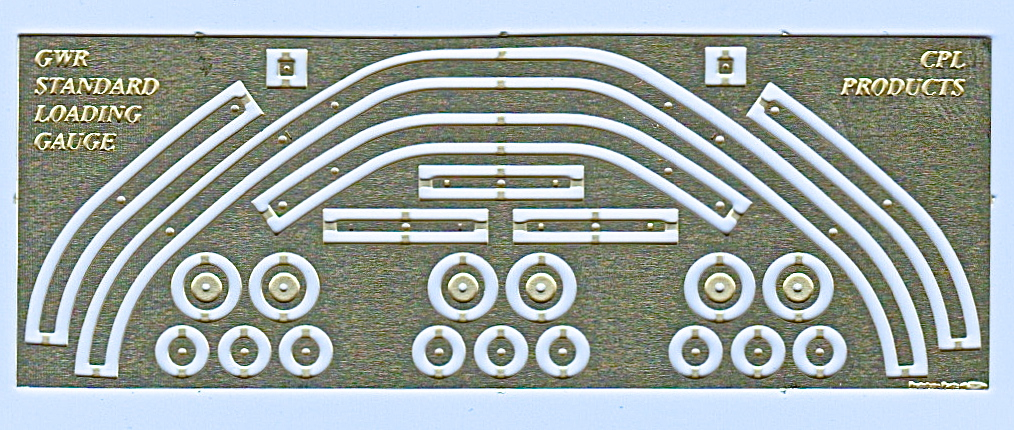
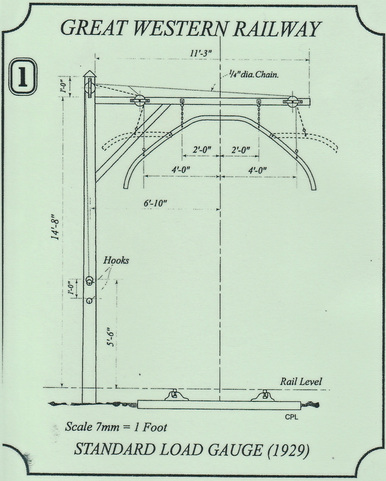
I now have an etch to produce the suspended ironwork and pulleys for a G.W.R. Goods loading gauge. The parts fit either the rail built standard type or the tapered wooden 1929 gallows type post.
|
|
|
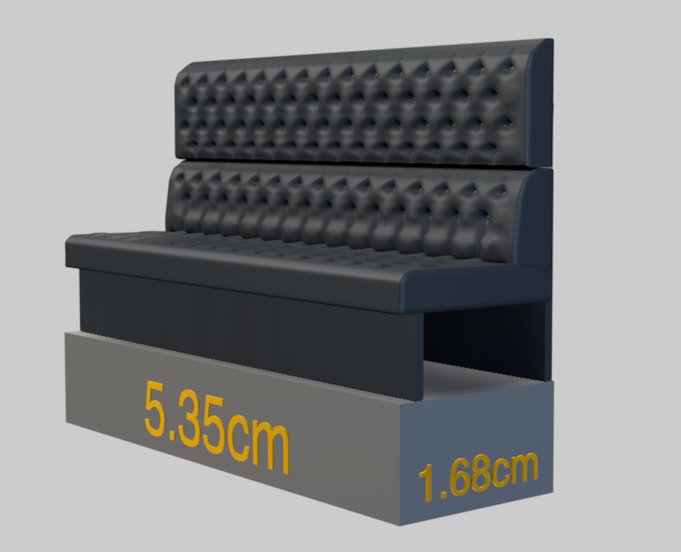
Buttoned Cushions
The first look at CPL buttoned seating. The top cushion is separate, leaving the lower back and squab as a single accurate component for use longitudinally below the windows in saloon carriages. The top can be cut about and used as raw material for upholstering the compartment inner seat sides and door panels too. The spacing allows the use of the Slaters partitions and armrests either for two or three seats abreast. The picture shows a render of the 3D file, which is 7mm, but of course with 3D it is straightforward enough to adjust them up to either 10 or reduce to 4mm. Either way, just trim the ends for corridor vehicles and spray to match reference.
Carriage Roofs
|
|
Once we have sorted out the films, there will be a database of roof profiles for those who might prefer not to roll their own (as it were) They will be plain, over length and have thin accurately spaced formers included for a uniform cross section, but they will be also be easily removable in case of partition or corridor fouling issues. Clerestories will come as a kit of two with spacers for the lower profile.
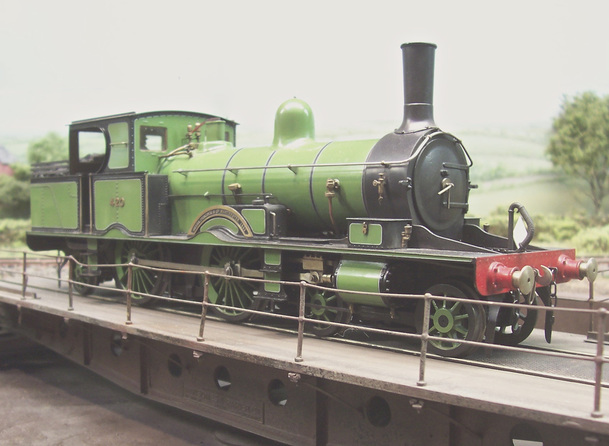
It looks as if CPL might be able to introduce a locomotive kit, but it is only a possibility at this stage. There is quite a lot of preparation work to make sure it gets done right. Here's a picture of a similar engine to the one I am looking at.
|
|
A new 7mm scale pattern has been produced to add to the large range of carriage seat upholstery. This pattern was used for GWR Railmotor tram type seating, so do let me know if you need any of this, just leave me a few days longer if you need 4mm.
There is a huge collection of locomotive name and number plates, and even more art films all done to very high standards but I haven't got round to listing them yet. Call me if you need anything and I can take a look through the stock. Of course the tender and side tank transfers and cab plates are in stock as well so the same also applies to these.
|
|
Another addition to the interior kits is in the pipeline now, with buttoned seat cushions developed from original patterns. These are some of the ongoing outlines and traces from the design project.
|
|
These brand new figures will be available soon, along with more seated passengers to come. This shows them in a first class mockup compartment jig, but there will be enough to do a couple more, including some different poses to fit on the bench seats of the third class. Luggage comes with them, and I think it might be a first to have the gent reaching up to the rack as you might when approaching or leaving a station. The heads are angled to allow natural placements like looking out of the window, or perhaps the other way, inclined towards one another in conversation. I always think it adds a natural behaviour pattern and an according realism. I hope you like them as much as I do.
The first batch of G.W.R. carriage etches has arrived and they look fine, I must now draw up lists of the correct castings and components to accompany them to their respective builders. A new batch will be off soon (also to commission), so I still have the films to sort out for this.
The big windows really show the interior of this composite dining saloon. I do have the carved first class mahogany seat ends done as etched overlays and their brass luggage racks above with very fine mesh grilles can be soldered on top for strength, but the tables still need to be laid with plates, cutlery, glasses , posh folded napkins and toast racks.
Andy Stadden is doing some new quality seated figures for carriage interiors, (existing figures pictured for now) and I am working on dining table accessories for Lee's upcoming first class dining saloons. Silver bowls for teatime sugar lumps and salt and pepperpots for dinner! A set of buttoned seat cushions will hopefully be available soon as part of more comprehensive interior kits which will have mirrors for the first class compartments, both corridor types and full width options, glass windows, luggage racks transfers and leather window pull straps. New Sepia prints will accompany the older carriages, while coloured maps and back and white photos will go with the later 30s period kits.
|

|
As well as Guildex, CPL will be at the Binfield show, so I will pop their details up soon, If time permits, I will also update the buffer kits with coil springs and 12BA nuts. obviously there will be a small price increase if this turns out to be a popular idea, but only by the cost of the additional parts.
The van is now piled with boxes and portfolios from my collection trip to Pat, and I can unload it all over the next few days. This will allow me to start recording all the products, with a view to publishing the first few pages as soon as time permits. Some of the flat artworks for etched components are already present as digital files, and these can eventually be listed and presented as thumbnails to ease identification.
A dedicated photo session at Kevin Wilson's collection will take place soon, and this will let us record many of the CPL products in situ, but if you have any of your own build photos, and you would like to support the effort, please do send them in as jpeg files to my e-mail address. I will of course credit the contributor in each case.
A dedicated photo session at Kevin Wilson's collection will take place soon, and this will let us record many of the CPL products in situ, but if you have any of your own build photos, and you would like to support the effort, please do send them in as jpeg files to my e-mail address. I will of course credit the contributor in each case.
Welcome to the first new pages of the CPL website, and thanks to Pat and Kevin for looking after me during this changeover.
I will be doing my best to include all the information into headed pages as an ongoing project over the next few months.
The existing product range will be listed with the same content and numbering, so if you do need anything from an old printed CPL catalogue that's fine.
Just contact me, and I will make sure you get your parts sent out as normal while the transition takes place.
01296 749070 or 07749 180505 ...... [email protected]
Let me know if I can help, and once I have sorted out the existing list, we can progress towards the additions of other components.
There is a possibility of doing rubber concertina corridor connections for example.
There is a possibility of doing rubber concertina corridor connections for example.
This is the new advert for the Gauge O Guild Gazette, and I might see if it will fit Railway Modeller as well